Jetson AGX Orin Developer Kit
This page covers flashing a Jetson AGX Orin Developer Kit with LmP artifacts.
Preparation
In your Factory, click on the latest
platformbuild.Expand the run for
jetson-agx-orin-devkit. Findlmp-factory-image-jetson-agx-orin-devkit.tegraflash.tar.gzand download the file.Unzip the file:
tar -xvf lmp-factory-image-jetson-agx-orin-devkit.tegraflash.tar.gz
The script used for flashing is doflash.sh.
Hardware Preparation
Set the board to boot into recovery mode:
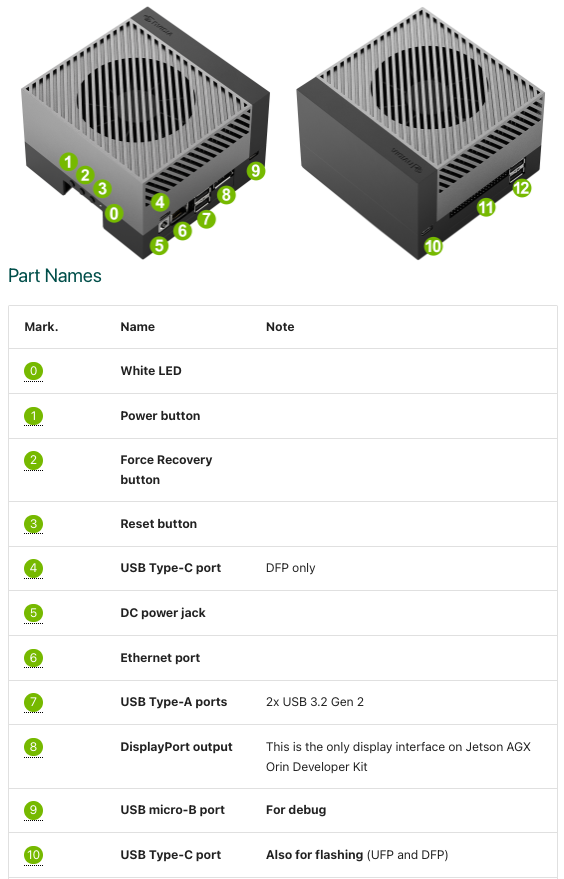
Fig. 83 jetson-agx-orin-devkit
Connect the USB cable in the base board Type-C connector (10) to the host machine.
While holding down the force recovery button, either press the Reset button (if already powered), or the Power button. Release both buttons.
To check if the board is in recovery mode,
lsusbcan be used. Check if a device from vendor0955(NVIDIA) is available:host:~$ lsusb | grep 0955 Bus 001 Device 014: ID 0955:7023 NVIDIA Corp. APX
This device is only available when the board successfully boots in recovery mode.
OPTIONAL: For UART output, connect a USB cable from the base board’s USB Micro B connector (9), to the host machine.
Flashing
- With the board powered in recovery mode, flash the board:
sudo ./doflash.shThis can take a few minutes to complete. The process can be watched from the host console or UART output.
- Once the flashing procedure finishes, reset the board to boot the installed LmP image.