Texas Instruments AM64x SKEVM
Building
When building the Cortex R5 U-Boot, all variants are built:
hs-fs(High Security/Field Securable), also known as SK-AM64B: This is a SoC/board state before a customer has blown the keys in the device, i.e., the state at which the HS device leaves TI factory. The device protects the ROM code, TI keys and certain security peripherals. In this state, devices do not force authentication for booting, however DMSC is locked.hs(High Security/Security Enforced), also known as SK-AM64B: This is a SoC/board state after successfully blowning the keys and set “customer keys enable”. In HS-SE device all security features are enabled. All secrets within the device are fully protected and all of the security goals are fully enforced. The device also enforces secure booting.gp(General Purpose), also known as SK-AM64: This is a SoC/board state with no device protection and authentication is not enabled for booting the device.
The default variant is hs-fs.
To boot an image on other variants without pre-flash files manipulations on the target file-system, we need to change the SYSFW_SUFFIX variable.
The following changes the default to gp, so that the image produced boots that variant:
echo 'SYSFW_SUFFIX:am64xx-evm-k3r5 = "gp"' >> meta-subscriber-overrides/conf/machine/include/lmp-factory-custom.inc
Preparation
Important
Ensure you replace <factory> with the name of your Factory.
Download the necessary files from
https://app.foundries.io/factories/<factory>/targets:- Click the latest Target with the platform trigger.
- Expand the run in the Runs section which corresponds with the name of the board.
Download the Factory image for that machine, e.g.,
lmp-factory-image-<machine-name>.wic.gzorlmp-base-console-image-<machine-name>.wic.gz.
Extract the file:
gunzip lmp-factory-image-am64xx-evm.wic.gz
Hardware Preparation
Set up the board for booting from MMC1–SDCard:
- Ensure that the power is off (remove cable from J8):
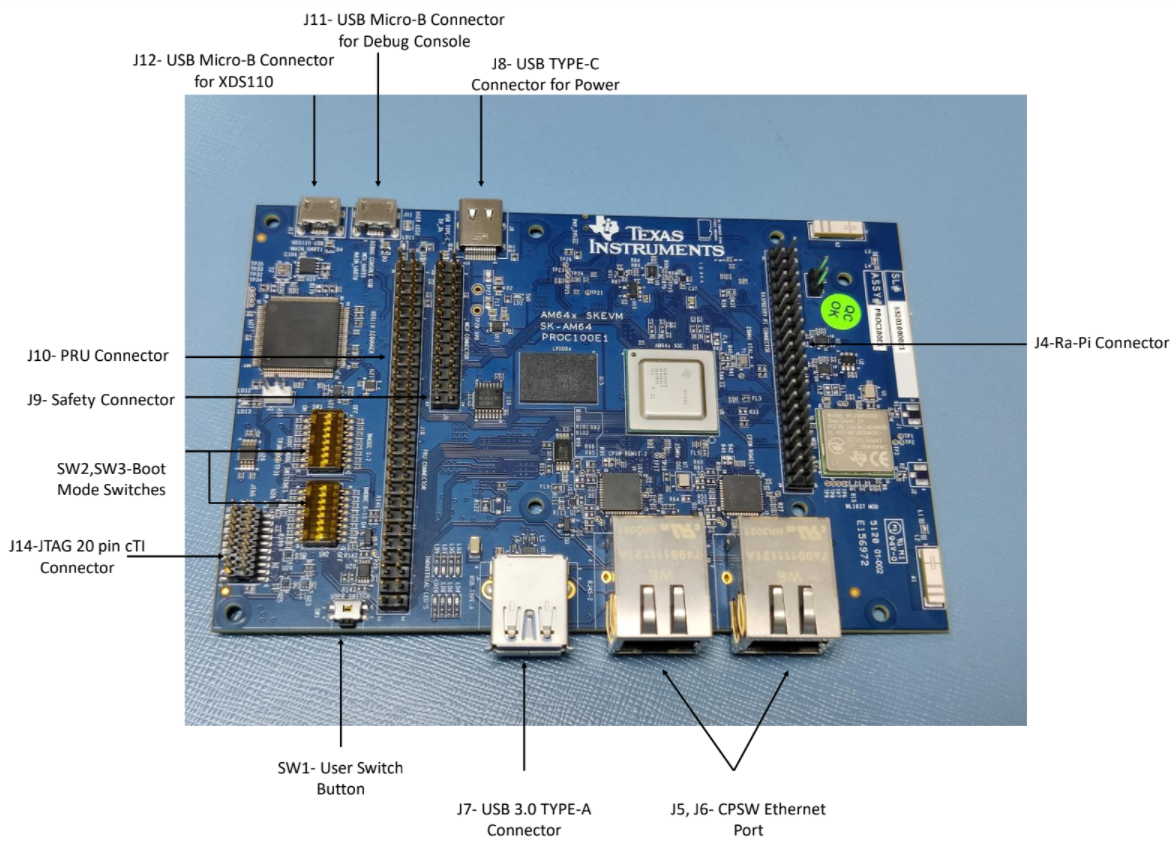
Fig. 76 AM64xx-sk top view
- Put the am64xx-sk into boot from SDCard Mode:
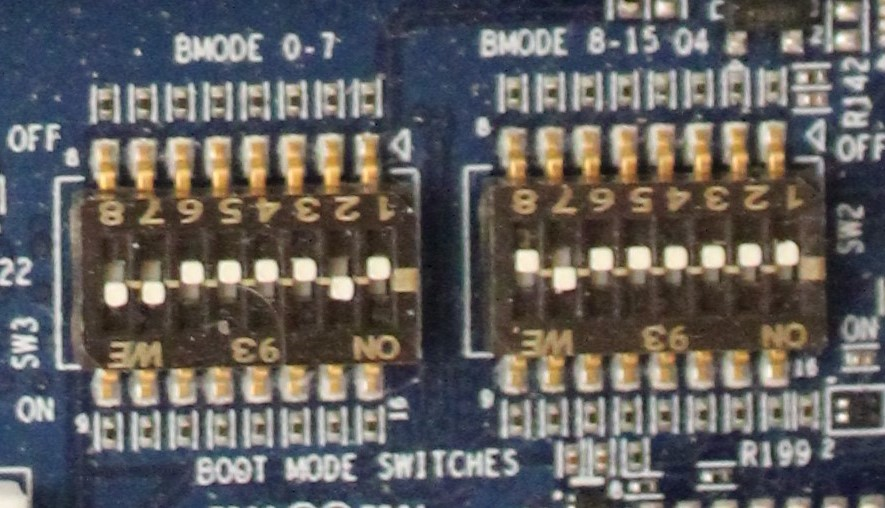
Fig. 77 Switch settings
Flashing
Flash lmp-factory-image-am64xx-evm.wic.gz to an SD Card.
This contains the bootable system image.
Determine which disk to flash by finding the device with the
SIZEthat matches that of your flash drive. Ignore partitions (indicated bypartunderTYPE). Note theNAMEof the flash drive (e.g.,/dev/mmcblk0,/dev/sdb), as it will be used for the disk path:lsblk -po +MODEL
$ lsblk -po +MODEL
NAME             MAJ:MIN RM   SIZE RO TYPE MOUNTPOINT                 MODEL
/dev/mmcblk0     179:0    0  29.8G  0 disk
├─/dev/mmcblk0p1 179:1    0  41.6M  0 part /mnt/boot
└─/dev/mmcblk0p2 179:2    0  29.8G  0 part /mnt/otaroot
/dev/zram0       254:0    0    26G  0 disk /out
/dev/nvme0n1     259:0    0 953.9G  0 disk                            SSDPEKKF010T8 NVMe INTEL 1024GB
Flash the disk.
Replace<system-image>with the path to your system image.Replace/dev/mmcblk<X>with your chosen disk path.
gunzip -c <system-image> | sudo dd of=/dev/mmcblk<X> bs=4M iflag=fullblock oflag=direct status=progress
Determine which disk you want to flash by finding the device with the
SIZEthat matches that of your flash drive. Ignore partitions (lines without*in theSIZE). Note theIDENTIFIERof the flash drive, (e.g.,/dev/disk3) as it will be used for the disk path:``diskutil list``:
$ diskutil list
/dev/disk3 (internal, physical):
   #:                       TYPE NAME                    SIZE       IDENTIFIER
   0:     FDisk_partition_scheme                        *15.5 GB    disk3
   1:             Windows_FAT_32 boot                    45.7 MB    disk3s1
   2:                      Linux                         15.5 GB    disk3s2
Flash the disk.
Replace<system-image>with the path to your system image.Replace/dev/disk<X>with your chosen disk path.
gunzip -c <system-image> | sudo dd of=/dev/disk<X> bs=4M
Windows has no built in tools for flashing the image to disk. We recommend you download and use either Win32 Disk Imager or Rufus.
Note
Your system image is in a compressed wic.gz format.
To follow these next steps, you must extract it using a tool like 7zip which will leave you with a .wic image file.
Using Rufus:
- Download and run Rufus.
- Select your disk.
- SELECT your
<system-image>. - START the flash procedure.
Using Win32 Disk Imager
- Download and run Win32 Disk Imager as Administrator.
- Click the blue folder icon.
- Select your
<system-image> - Select your disk via the Device dropdown.
- Click Write
- Wait for the image to finish writing. A Write Successful dialog will appear.
- Remove the flash drive and connect it to the board.
- Power on the board to boot the new image.
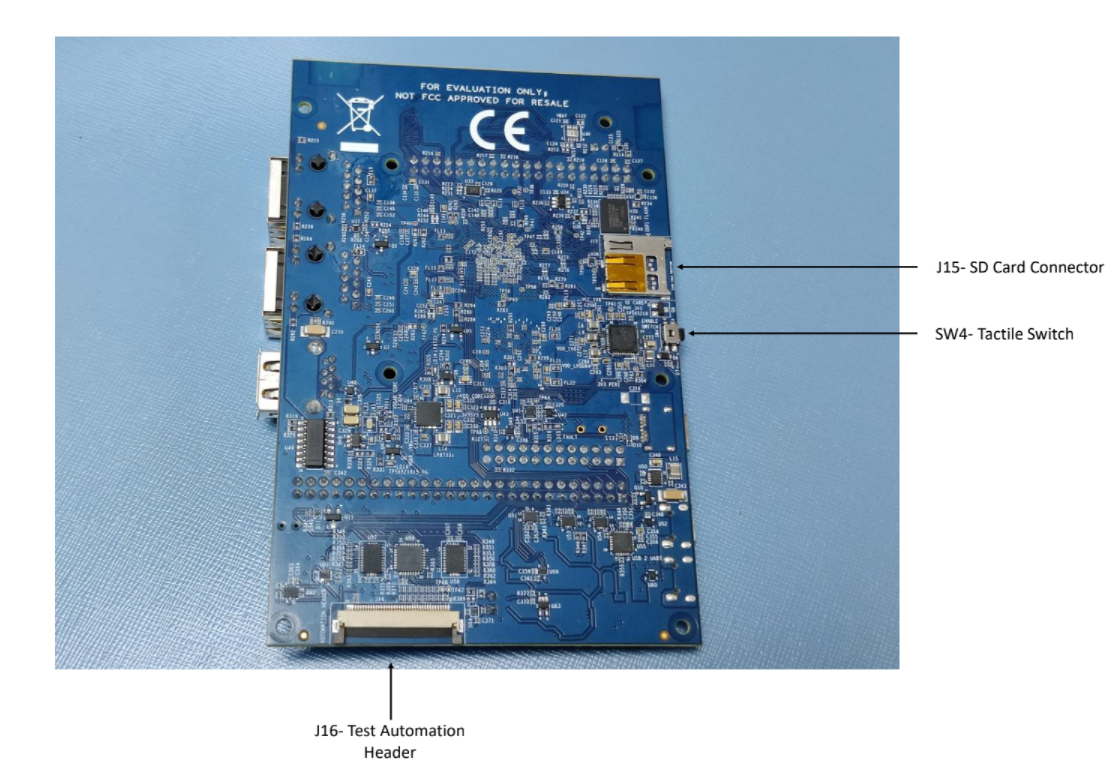
Fig. 78 SDCard location