Foundries.io REST API#
The FoundriesFactory™ Platform implements a REST API that allows you to interact with you Factory and devices. This section examples use of the REST API with curl (command-line tool for transferring data using various network protocols).
To follow this section, it is important to have:
Prerequisites#
Completed the getting started guide up to Flashing Your Device.
Creating Token#
Tip
To access the API, you must first login to your Factory.
To interact with the Foundries.io API, create a token.
Go to Tokens and create a new API Token by clicking on + New Token.
Complete with a Description and Expiration date, and select next.
Check the Use for tools like fioctl box and select your Factory.
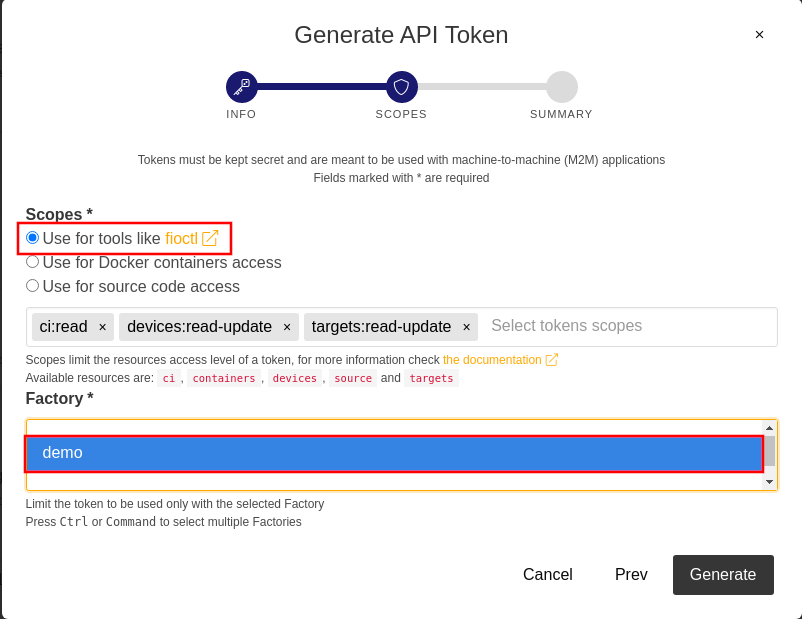
Fig. 49 Token for REST API#
Save the output, as this is is your <API_TOKEN> value.
Getting Started#
The Foundries.io API includes a complete OpenAPI definition. To get started, configure your host terminal with the variables below:
$ export FACTORY=<FACTORY>
$ export TOKEN=<API_TOKEN>
Note
Make sure to replace <FACTORY> with your Factory name and <API_TOKEN> with the token value.
Device List#
This function returns a list of devices registered in your Factory.
The HTTP response includes the same data from your Factory’s Devices tab.
Documentation can be found at Foundries.io API under devices.
Run:
$ curl -H "OSF-TOKEN: $TOKEN" https://api.foundries.io/ota/devices/
"devices": [
  {
        "uuid": "f4120660-ffbf-483f-b2ca-a6186da467f4",
        "owner": "5e13232f73927550af883e7b",
        "factory": "getting-started",
        "name": "device-01",
        "created-at": "2024-11-11T14:17:50+00:00",
        "last-seen": "2024-11-11T14:17:57+00:00",
        "ostree-hash": "cfacf42873aa06fbf53d7b1bfcb72032f21631b068620e575696ab2ab0670efd",
        "target-name": "raspberrypi4-64-lmp-2",
        "current-update": "",
        "device-tags": [
          "devel"
        ],
        "tag": "devel",
        "docker-apps": [],
        "network-info": {
          "hostname": "raspberrypi4-64",
          "local_ipv4": "192.168.15.13",
          "mac": "b8:27:eb:ca:78:75"
        },
        "up-to-date": true,
        "public-key": "-----BEGIN PUBLIC KEY-----\nMFkwEwYHKoZIzj0CAQYIKoZIzj0DAQcDQgAE2l3TY/Gu8W+euAA8bVufhxmCK0YR\ngt3B8XPXGS4rVRD3jfjjf7cCJQ4GLtvs+phTgeLiRJwTyWzsFZGYxqN1aA==\n-----END PUBLIC KEY-----\n",
        "is-prod": false,
        "is-wave": false
      }
    ],
    "page": 1,
        "pages": 1,
        "limit": 1000,
    "total": 1
  }
Targets List#
This function returns a list of your Factory targets.
The HTTP response includes the same data from the Targets tab of the Factory.
You can find documentation at Foundries.io API under factories.
Run:
$ curl -H "OSF-TOKEN: $TOKEN" https://api.foundries.io/ota/factories/$FACTORY/targets/
{
  "raspberrypi4-64-lmp-3": {
    "custom": {
      "arch": "aarch64",
      "cliUploaded": false,
      "createdAt": "2025-07-28T20:40:39Z",
      "hardwareIds": [
        "raspberrypi4-64"
      ],
      "image-file": "lmp-factory-image-raspberrypi4-64.wic.gz",
      "lmp-manifest-sha": "b7d11e4f7d20f1fae63e1f54d8b5f48557fa40c1",
      "meta-subscriber-overrides-sha": "7de1123998c9b362df278132fde8fccb57215647",
      "name": "raspberrypi4-64-lmp",
      "tags": [
        "main"
      ],
      "targetFormat": "OSTREE",
      "updatedAt": "2025-07-28T20:40:39Z",
      "uri": "https://ci.foundries.io/projects/getting-started/lmp/builds/3",
      "version": "3"
    },
    "hashes": {
      "sha256": "f190733c576920a203acd40d8df1cb82135aaf50f0b2c5fa8402745d73a633b3"
    },
    "length": 0
  },
  "raspberrypi4-64-lmp-2": {
    "custom": {
      "arch": "aarch64",
      "cliUploaded": false,
      "createdAt": "2025-07-28T20:15:29Z",
      "hardwareIds": [
        "raspberrypi4-64"
      ],
      "image-file": "lmp-factory-image-raspberrypi4-64.wic.gz",
      "lmp-manifest-sha": "b6483a7b0bd666b5b871662fa46477cdeede80f2",
      "meta-subscriber-overrides-sha": "7de1123998c9b362df278132fde8fccb57215647",
      "name": "raspberrypi4-64-lmp",
      "tags": [
        "devel"
      ],
      "targetFormat": "OSTREE",
      "updatedAt": "2025-07-28T20:15:29Z",
      "uri": "https://ci.foundries.io/projects/getting-started/lmp/builds/2",
      "version": "2"
    },
    "hashes": {
      "sha256": "cfacf42873aa06fbf53d7b1bfcb72032f21631b068620e575696ab2ab0670efd"
    },
    "length": 0
  }
}
Configure Device#
It is also possible to send configuration files to your device or fleet.
To send a configuration file named app.config to your device.
app.config:
[page]
url = "https://foundries.io/"
Convert the file contents into properly escaped JSON string:
[page]\nurl = \"https://foundries.io/\"\n"
Use the command below to create the
API_DATAvariable.Note that
valueis set with the file content, andnamewith the file name.$ export API_DATA='{ "reason": "API test", "files": [{"name":"app.config","unencrypted":true,"value":"[page]\nurl = \"https://foundries.io/\"\n"}]}'
Define
DEVICE_NAMEand configure your device using curl with-X PATCH:$ export DEVICE_NAME=<DEVICE_NAME> $ curl --data "$API_DATA" -H "Content-Type: application/json" -H "OSF-TOKEN: $TOKEN" -X PATCH https://api.foundries.io/ota/devices/$DEVICE_NAME/config/
{ "created-at": "2024-11-11T15:59:07", "applied-at": null, "reason": "API test", "files": [ { "name": "app.config", "value": "[page]\nurl = \"https://foundries.io/\"\n", "unencrypted": true } ] }
After a moment, fioconfig receives the changes, and you can find the configuration file on your device under /var/run/secrets/.
device:~$ sudo cat /var/run/secrets/app.config
[page]
url = "https://foundries.io/"
Enabling/Disabling Application#
You can configure what application or tag the device should use.
For example, to enable the shellhttpd application, you send a JSON file similar to:
{
"name": "z-50-fioctl.toml",
"on-changed": [
"/usr/share/fioconfig/handlers/aktualizr-toml-update"
],
"unencrypted": true,
"value": "\n[pacman]\n compose_apps = \"shellhttpd\"\n"
}
The command below adds the JSON to the API_DATA variable:
$ export API_DATA='{ "reason": "API test", "files": [{"name":"z-50-fioctl.toml","on-changed":["/usr/share/fioconfig/handlers/aktualizr-toml-update"],"unencrypted":true,"value":"\n[pacman]\n compose_apps = \"shellhttpd\"\n"}]}'
Define the variable DEVICE_NAME and configure your device using curl with -X PATCH:
$ export DEVICE_NAME=<DEVICE_NAME>
$ curl --data "$API_DATA" -H "Content-Type: application/json" -H "OSF-TOKEN: $TOKEN" -X PATCH https://api.foundries.io/ota/devices/$DEVICE_NAME/config/
{"created-at": "2024-11-10T19:02:30", "applied-at": null, "reason": "API test", "files": [{"name": "wireguard-client", "value": "enabled=0\n\npubkey=J0H7CMG10TsTEai2Ui35KV0fb5oaJ8qd+mnWgIu091s=", "unencrypted": true}, {"name": "z-50-fioctl.toml", "on-changed": ["/usr/share/fioconfig/handlers/aktualizr-toml-update"], "value": "\n[pacman]\n compose_apps = \"shellhttpd\"\n", "unencrypted": true}]}
Learning More About the REST API#
Logged into http://app.foundries.io, you may interact with the REST API from your browser at <http://api.foundries.io/ota>.
Click on the operation to test. This shows the Try it out option.
Customize parameters.
Execute to test.
Once executed, it displays a curl command reference.
Check the response:
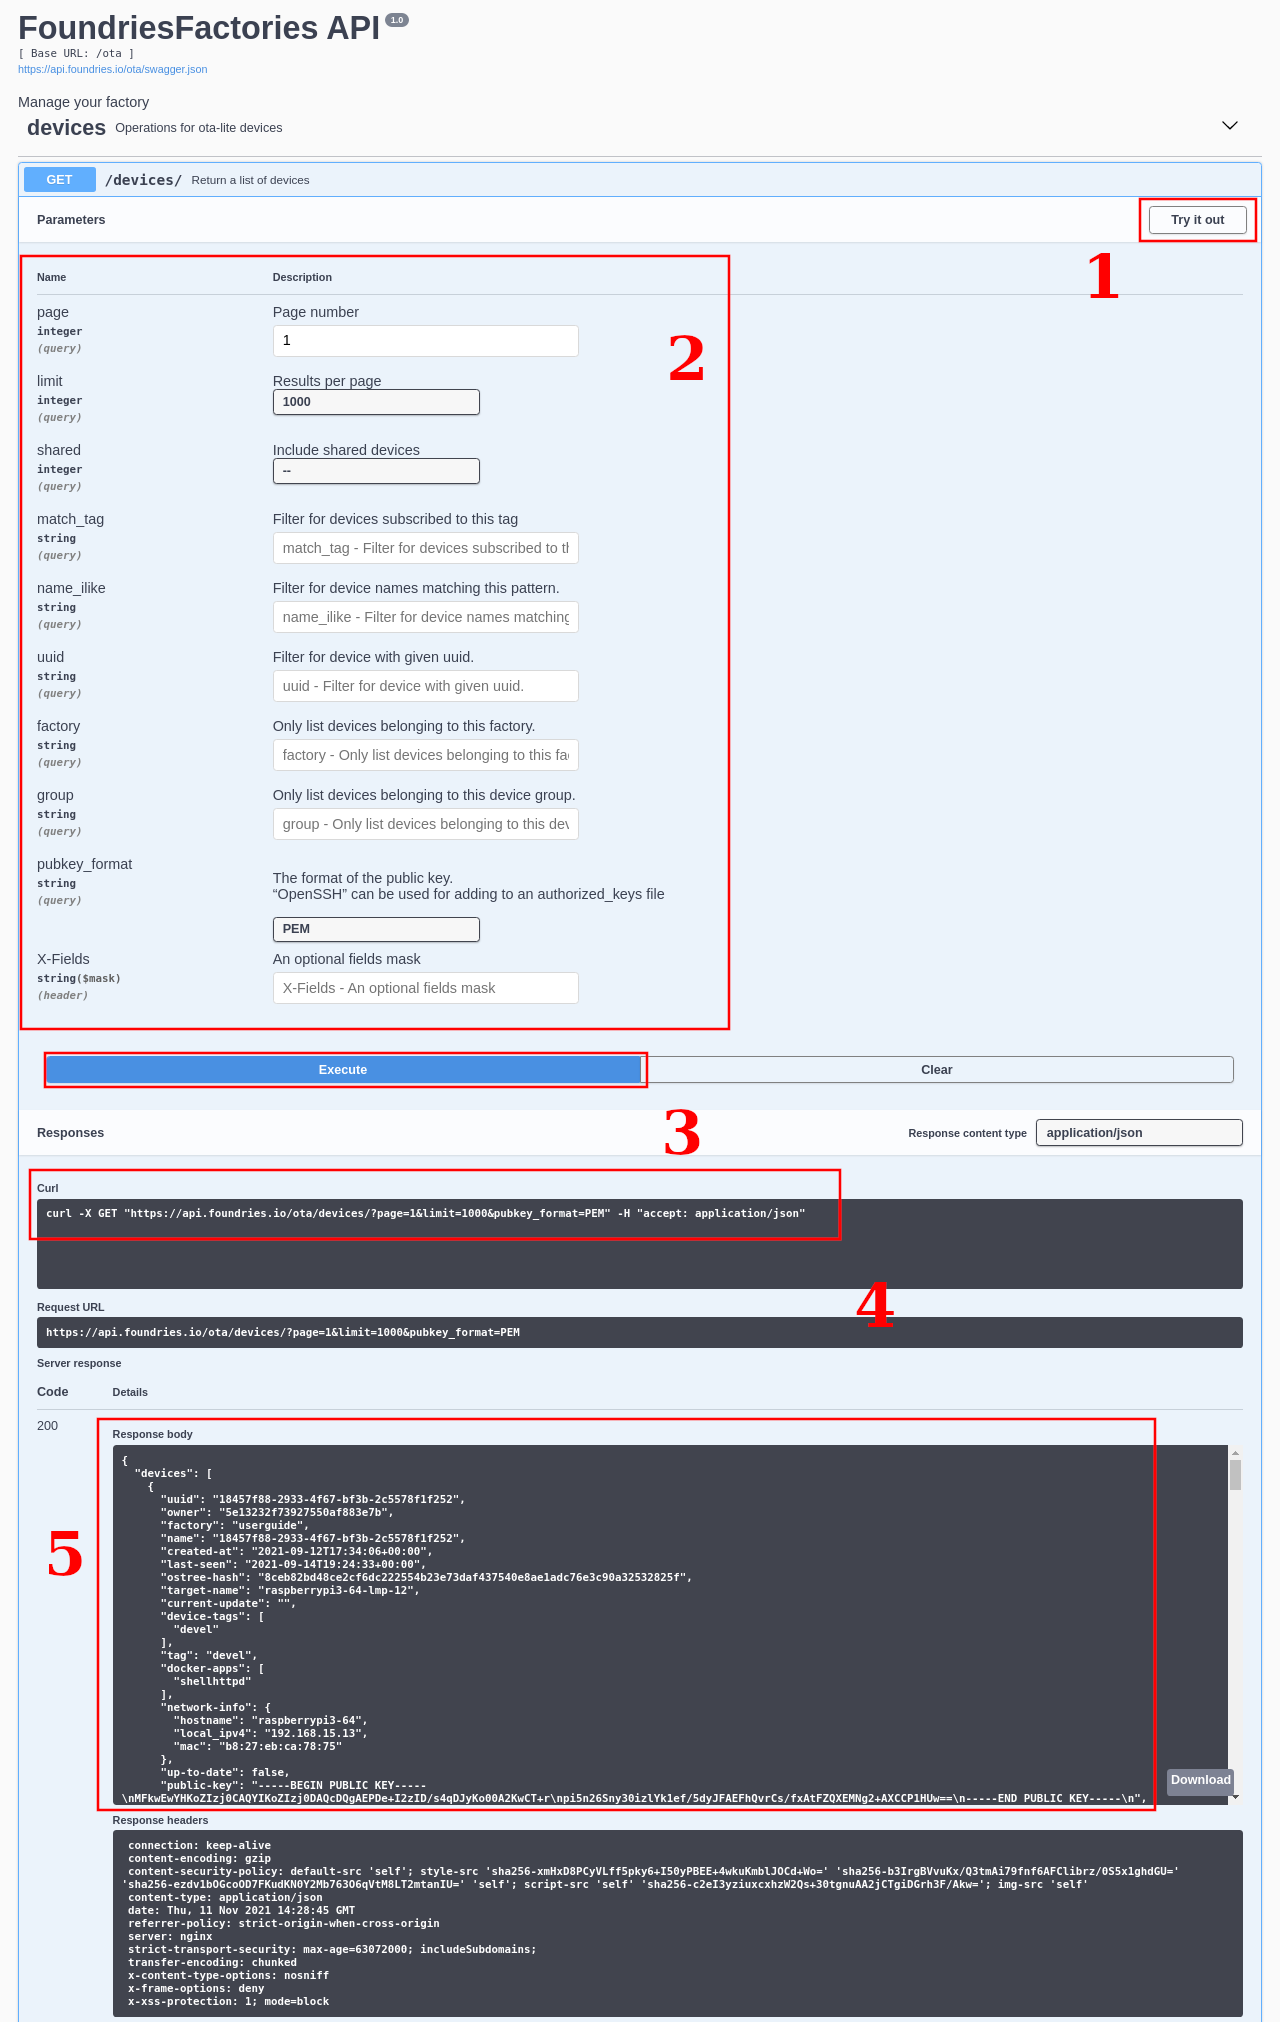
Fig. 50 Foundries.io REST API page illustration#
This allows you to explore the Foundries.io REST API and its possibilities.