Troubleshooting and FAQ#
This page covers a variety of topics, from addressing specific errors, general how to, and tips/about.
Errors and Solutions#
Fioctl Errors#
If fioctl configure-git fails with an error, manual steps can be taken to get the exact same result:
Configure Git with the necessary credentials:
$ git config --global credential.https://source.foundries.io.username fio-oauth2
$ git config --global credential.https://source.foundries.io.helper fio
Create the symbolic link manually. The correct path will be displayed in the
fioctlerror message and may vary depending on your operating system and Git configuration environment.
Example:
   $ fioctl configure-git
   Symlinking /usr/local/bin/fioctl to /opt/homebrew/bin/git-credential-fio
   ERROR: symlink /usr/local/bin/fioctl /opt/homebrew/bin/git-credential-fio: file exists

In the above example, the symbolic link command would be:

.. code-block:: console

   $ sudo ln -sf /usr/local/bin/fioctl /usr/local/bin/git-credential-fio

However, for Linux environments, it is usually:

.. code-block:: console

   $ sudo ln -s /usr/local/bin/fioctl /usr/bin/git-credential-fio
Configure Git to use the correct git-credential-fio helper by specifying its path:
$ git config --global credential.helper /path/to/symlinking/git-credential-fio
Tip
For troubleshooting, prepend GIT_CURL_VERBOSE=1 GIT_TRACE=1 to your git clone
command. This modification will provide more detailed information during
the cloning process. Carefully review the logs to ensure that the git-credential-fio
helper has been executed for credential management.
To verify that git-credential-fio get is functioning correctly, run this command
and then press Control + D. This action allows you to check if the password
required for logging into source.foundries.io is correct.
Aktualizr-Lite Common Reports#
This section shows some common returns from aktualizr-lite operations.
Tip
To get the aktualizr-lite logs, run:
$ sudo journalctl -fu aktualizr-lite
curl error 3
curl error 3 (http code 0): URL using bad/illegal format or missing URL
This could mean that the device is not properly registered, but there is a faulty /var/sota/sql.db file available.
This file may be created when aktualizr-lite is run manually before registering the device.
Solution: Re-flash or Re-Register a Device.
Make sure the device is properly registered before running aktualizr-lite.
curl error 6 or 56
curl error 6 (http code 0): Couldn't resolve host name
Or:
curl error 56 (http code 0): Failure when receiving data from the peer
These could mean that there is no networking available and/or the device cannot talk to the device gateway.
This could be due to a broken registration or a faulty /var/sota/sql.db file.
These can also mean that the DNS is not working correctly (for instance, IPv6 only).
Solution: Re-flash or Re-Register a Device. Check that all operations have succeeded before setting up your Device Gateway Public Key Infrastructure (PKI).
curl error 7 or 28
curl error 7 (http code 0): Couldn't connect to server
Or:
curl error 28 (http code 0): Timeout was reached
These could mean that a device cannot reach the server.
Solution: Make sure your device has a good connection. Check for proxies or firewalls in the network. If you are Setting up your Device Gateway PKI, make sure all operations have succeeded.
Tip
The openssl s_client command is useful for troubleshooting network issues. For example:
$ openssl s_client -connect <dg>:8443 -cert client.pem -key pkey.pem -CAfile root.crt
Where:
<dg>: Device gateway address, defaults toota-lite.foundries.io. The actual address can be found in/var/sota/sota.toml,[tls].serverfield.
Failed to update Image repo metadata
Failed to update Image repo metadata: The root metadata was expired.
This means The Update Framework (TUF) root key has expired.
Solution: Rotate your Offline Factory TUF Keys.
Failed to update Image repo metadata: The timestamp metadata was expired.
This means the Target to update to has expired.
Tip
The Target metadata freshness can be checked on the host with:
$ curl -H "osf-token: <token>" "https://api.foundries.io/ota/repo/<factory>/api/v1/user_repo/timestamp.json?tag=<tag>[&production=1]" | jq ."signed"."expires"
Where:
<tag>: Device tag.<token>: API Token withtargets:readscope.<factory>: Factory name.
Solution: Create a new Target for the same tag.
Failed to update Image repo metadata: Failed to fetch role timestamp in image repository.
This could mean that there is no Target available to update to. If this is a production device, it could mean that there are no Production Targets/waves available for that tag.
Tip
The Target metadata available for the device can be checked with the following commands:
On the device:
$ curl -H "x-ats-tags: <tag>" https://<dg>:8443/repo/targets.json --cert client.pem --key pkey.pem --cacert root.crt
Or on the host:
.. code-block:: console
$ fioctl targets list –by-tag <tag> –production
Where:
<tag>: Device tag.<dg>: Device gateway address, defaults toota-lite.foundries.io. The actual address can be found in/var/sota/sota.toml,[tls].serverfield.<token>: API Token withtargets:readscope.
Check Debugging Network Connectivity for a reference on running curl commands on the device.
Solution: Create a wave for the wanted tag.
Configuration file wrong or corrupted
Configuration file wrong or corrupted
warning: Failed resetting bootcount
This means that the device cannot access the U-Boot environment.
Solution: Check if fstab is properly set.
KeyId is not valid
KeyId xxxxxxxxxxxxxxxxxxxxxxxxxxxxxxxxxxxxxxxxxxxxxxxxxxxxxxxxxxxxxxxx is not valid to sign for this role (root).
This is not an actual error.
It only indicates that the TUF root key has been rotated.
It can be shown more than once in the aktualizr-lite logs depending on how many times the TUF root key has been rotated.
Solution: No fix needed, this log can be ignored as this is expected behavior.
OTA Update Fails Because of Missing SPL Keys#
When updating to a newer base lmp-manifest, your Factory may face issues with OTA upgrades from v85 to the next release.
It manifests as a failed boot attempt and error in the u-boot log:
U-Boot SPL 2021.04+fio+g38c3083e39 (Feb 16 2022 - 14:50:02 +0000)
power_pca9450b_init
DDRINFO: start DRAM init
DDRINFO: DRAM rate 3000MTS
DDRINFO:ddrphy calibration done
DDRINFO: ddrmix config done
Normal Boot
Trying to boot from MMC2
SPL: Booting secondary boot path: using 0x1300 offset for next boot image
## Checking hash(es) for config config-1 ... fit_config_verify_required_sigs: No signature node found: FDT_ERR_NOTFOUND
SPL_FIT_SIGNATURE_STRICT needs a valid config node in FIT
### ERROR ### Please RESET the board ###
This suggests that the SPL key is missing from the Factory.
The key is defined in the OE recipe and it defaults to spldev.
UBOOT_SPL_SIGN_KEYNAME="spldev"
This can be confirmed by checking whether files spldev.key or spldev.crt are missing from the lmp-manifest/factory-keys directory.
If so, the easiest fix is to generate the keys and add them to the repository.
$ cd factory-keys
$ openssl genpkey -algorithm RSA -out spldev.key \
      -pkeyopt rsa_keygen_bits:2048 \
      -pkeyopt rsa_keygen_pubexp:65537
$ openssl req -batch -new -x509 -key spldev.key -out spldev.crt
Once the spldev.key and spldev.crt are created, add them to the repository.
$ git add factory-keys/spldev.key
$ git add factory-keys/spldev.crt
$ git commit
Once the commit is pushed upstream, the FoundriesFactory™ Platform CI will generate a build that fixes the issue.
Request Entity Too Large Error#
This error occurs when your Factory has accumulated too much Target metadata to be signed by The Update Framework (TUF). All of your Targets contained in targets.json can grow large over time:
Signing local TUF targets
== 2020-11-24 23:12:53 Running: garage-sign targets sign --repo /root/tmp.dNLAIH
--key-name targets
|  signed targets.json to /root/tmp.dNLAIH/roles/targets.json
|--
Publishing local TUF targets to the remote TUF repository
== 2020-11-24 23:12:55 Running: garage-sign targets push --repo /root/tmp.dNLAIH
|  An error occurred
|  com.advancedtelematic.libtuf.http.SHttpjServiceClient$HttpjClientError:
ReposerverHttpClient|PUT|http/413|https://api.foundries.io/ota/repo/magicman//api/v1/user_repo/targets|<html>
|  <head><title>413 Request Entity Too Large</title></head>
|  <body>
|  <center><h1>413 Request Entity Too Large</h1></center>
|  <hr><center>nginx/1.19.3</center>
|  </body>
|  </html>
Solution#
Over time, the manual pruning (deletion) of Targets is maintenance you should consider.
Pruning can be done using Fioctl™. This removes outdated Targets from your Factory’s targets.json, allowing the production of new Targets.
Warning
Ensure there are no important devices running on a Target that is about to be pruned. If you are intending on pruning production tags, be cautious and mindful of what you are doing.
You can prune/delete individual Targets by using their TUF Target name:
$ fioctl targets prune <TUF_Target_name>
Or, you can prune by tag, such as devel or experimental:
$ fioctl targets prune --by-tag <tag>
We do not recommend nor support pruning all Targets from a tag.
Doing so can lead to container builds failing from the lack of platform builds for the tag.
To keep the last <number> of the Targets from a tag, use:
$ fioctl targets prune --by-tag <tag> --keep-last <number>
There is also the --dryrun option.
This lets you can check the pruned targets before running the actual command:
$ fioctl targets prune --by-tag <tag> --keep-last <number> --dryrun
Device Registration Common Errors#
Even if the device has a proper internet connection, users can still run into errors during device registration.
The lmp-device-register provides some diagnostics in the error message without exposing sensitive information to avoid possible attack vectors.
Here, we show additional information to help debug of common errors encountered during the registration:
Unable to create device: HTTP_401
Polis Error: {"error":"not_found","error_description":"Cannot find a user with the provided token","status":404}
This indicates a problem with the token.
Solution: Verify there is a valid non-expired token in https://app.foundries.io/settings/tokens/.
Unable to create device: HTTP_403
message: A factory admin must add you to a team with one of these scopes: devices:create
This indicates no permission to create a device in the Factory.
Solution: Verify the user token has device:create scope in https://app.foundries.io/settings/tokens/.
If the Factory has Team Based Factory Access set, check if the user is part of a team which has device:create permissions.
Error authorizing device: 'scope' parameter is not valid: wrong Factory value
This usually means the device is running an image which was built locally and not on FoundriesFactory CI.
Solution: Flash an image built from CI.
How Tos#
Aktualizr-Lite and Fioconfig Polling Time#
Both fioconfig and aktualizr-lite poll for new configuration and updates every 5 minutes by default.
It can be helpful to decrease this interval for development purposes.
Following are two ways to achieve this.
Option A: Changing Interval in Runtime#
On your device, create a settings file in the
/etc/sota/conf.d/folder to configureaktualizr-lite.device:~$ sudo mkdir -p /etc/sota/conf.d/ device:~$ sudo sh -c 'printf "[uptane]\npolling_sec = <time-sec>" > /etc/sota/conf.d/90-sota-fragment.toml'
Next, create a settings file in the
/etc/default/folder to configurefioconfig.device:~$ sudo sh -c 'printf "DAEMON_INTERVAL=<time-sec>" > /etc/default/fioconfig'
Restart both services:
device:~$ sudo systemctl restart aktualizr-lite
device:~$ sudo systemctl restart fioconfig
Note
Make sure to replace <time-sec> with the expected poll interval in seconds.
Option B: Changing Interval Included in the Build#
First, configure the aktualizr-lite polling interval:
Create the
sota-fragmentfolder inmeta-subscriber-overridesrepo:$ cd meta-subscriber-overrides $ mkdir -p recipes-sota/sota-fragment
Add a new file under this directory:
$ touch recipes-sota/sota-fragment/sota-fragment_0.1.bb
Include the content below to the file created in the last step:
SUMMARY = "SOTA configuration fragment"
SECTION = "base"
LICENSE = "MIT"
LIC_FILES_CHKSUM = "file://${COMMON_LICENSE_DIR}/MIT;md5=0835ade698e0bcf8506ecda2f7b4f302"

inherit allarch

SRC_URI = " \
        file://90-sota-fragment.toml \
"

S = "${WORKDIR}"

do_install() {
        install -m 0700 -d ${D}${libdir}/sota/conf.d
        install -m 0644 ${WORKDIR}/90-sota-fragment.toml ${D}${libdir}/sota/conf.d/90-sota-fragment.toml
}

FILES:${PN} += "${libdir}/sota/conf.d/90-sota-fragment.toml"
Create another directory under the one we just created so we can supply the source file (
90-sota-fragment.toml) for the recipe above:$ cd meta-subscriber-overrides $ mkdir -p recipes-sota/sota-fragment/sota-fragment
Create
90-sota-fragment.tomlunder this new directory:[uptane] polling_sec = <time-sec>
Note
Make sure to replace <time-sec> with the expected poll interval in seconds.
In the
recipes-samples/images/lmp-factory-image.bbfile, include this new package underCORE_IMAGE_BASE_INSTALL. For example:--- a/recipes-samples/images/lmp-factory-image.bb +++ b/recipes-samples/images/lmp-factory-image.bb @@ -24,9 +24,10 @@ CORE_IMAGE_BASE_INSTALL += " \ networkmanager-nmcli \ git \ vim \ + sota-fragment \ ..."
Next, we configure the
fioconfigdaemon interval. Create thefioconfigfolder inmeta-subscriber-overridesrepo$ cd meta-subscriber-overrides $ mkdir -p recipes-support/fioconfig
Add a new recipe file,
fioconfig_git.bbappend, under this directory and include the following:FILESEXTRAPATHS:prepend := "${THISDIR}/${PN}:" SRC_URI:append = " \ file://fioconfig.conf \ " do_install:append() { install -Dm 0644 ${WORKDIR}/fioconfig.conf ${D}${sysconfdir}/default/fioconfig }Create another directory under the one we just created so we can supply the source file (
fioconfig.conf) for the recipe above:$ cd meta-subscriber-overrides $ mkdir -p recipes-support/fioconfig/fioconfig
Create the
fioconfig.conffile under this new directory including:DAEMON_INTERVAL=<time-sec>
Note
Make sure to replace
<time-sec>with the expected poll interval in seconds.
Commit and trigger a new build to include these new changes and have a new polling interval.
Re-Register a Device#
During development, you may need to re-register the same device. Follow these steps to do so:
Delete the device from the UI
Devicestab or with:$ fioctl device delete <device-name>
Stop
aktualizr-liteandfioconfigon the device:device:~$ systemctl stop aktualizr-lite device:~$ systemctl stop fioconfig.path device:~$ systemctl stop fioconfig.service
Delete both
sql.dbandclient.pemon the device:device:~$ rm /var/sota/sql.db device:~$ rm /var/sota/client.pem
Lastly, perform the registration again.
Read Secure Variables from Containers#
After a board is fused and closed, the secure storage—Replay Protected Memory Block (RPMB)—becomes available and handles the necessary variables to perform the OTA logic. Secure storage also can be leveraged to store custom device information, like MAC addresses, serial numbers, and other relevant values.
You may wish to retrieve these values from the application.
Please refer to the fiovb-container example,
which brings a simple application to run fiovb_printenv from inside a container.
Enable U-Boot Boot Delay#
By default, LmP disables U-Boot’s boot delay feature for security purposes. However, this is a powerful ally during the development phase, as it provides direct access to U-Boot’s environment for debugging.
Secured/Closed Boards
This requires changing the
lmp.cfgU-Boot config fragment in order to overrideCONFIG_BOOTDELAY=-2set by default in LmP.Create
bootdelay.cfgconfiguration fragment:meta-subscriber-overrides/recipes-bsp/u-boot/u-boot-fio/<machine>/bootdelay.cfg:
CONFIG_BOOTDELAY=3
Append it to the U-Boot source:
meta-subscriber-overrides/recipes-bsp/u-boot/u-boot-fio_%.bbappend
FILESEXTRAPATHS:prepend := "${THISDIR}/${PN}:"

SRC_URI:append = " \
file://bootdelay.cfg \
"
After pushing to the Factory, it is necessary to trigger Secure Boot Firmware Updates for the devices to take the update, or re-flash the device entirely to include this change.
Open Boards
Open/non-secured boards also benefit from the procedure detailed for secured boards, however as they rely on U-Boot env support, there is a handier way on enabling boot delay during runtime:
$ sudo su
# fw_setenv bootdelay 3
# reboot
After reboot, the device shows the U-Boot bootdelay prompt.
Tips and Abouts#
Bind Mounting a File Into a Container#
When bind mounting a file into a container, the parent directory needs to be bind mounted. If a bind mount destination does not exist, Docker will create the endpoint as an empty directory rather than a file.
The Docker documentation on containers and bind mounting is a good place to start if you wish to learn more about this.
NXP SE05X Secure Element and PKCS#11 Trusted Application#
There are two memory limits to be aware of. One is the Secure Element’s non-volatile memory. The other is the built-time configurable PKCS#11 Trusted Application (TA) heap size.
When RSA and EC keys are created using the TA, a request is sent to the Secure Element (SE) for the creation of those keys. On success, a key is created in the SE’s non volatile memory. The public key is then read back from the SE to the TA persistent storage. Note only a handle to the private key in the Secure Element is provided and stored by the TA.
During that creation process the TA also keeps a copy of the key on its heap.
This means that a system that creates all of its keys during boot may run out of heap before running out of SE storage.
To avoid this issue, configure OP-TEE with a large enough CFG_PKCS11_TA_HEAP_SIZE.
It should allow the client to fill the SE NVM before an out of memory condition is raised by the TA.
This will help avoid a secure world panic.
An experimental way to validate the thresholds is to loop on RSA or EC key creation until it fails.
If there is a panic or a PKCS#11 OOM fault, CFG_PKCS11_TA_HEAP_SIZE can then be increased as there is still room in the SE NVM to store more keys.
Debugging Network Connectivity#
When debugging network connectivity and access issues, it can be helpful to use curl.
However, LmP does not ship with the command.
Rather than including curl on the host device, a simple approach is to run it via a Alpine Linux® container:
$ docker run --rm -it alpine
/ # apk add curl
/ # curl
Debugging User Permissions#
If the Factory has Teams defined, user permissions are defined by the teams they are part of.
This shows steps to help troubleshooting unexpected permission problems.
Get user ID:
$ fioctl users
Get user information:
$ fioctl users <ID>
ID                        NAME                  ROLE
--                        ----                  ----
XXXXXXXXXXXXXXXXXXXXXXXX  User Name             User Role

TEAMS
-----

EFFECTIVE SCOPES
----------------
This returns the combination of scopes allowed to this particular user based on their teams.
If this does not have the expected scopes, the Factory Owner/Admin may need to add the user to a proper Team with the wanted scopes.
If this returns the expected scopes, verify if the proper scopes are also set for the private token set at https://app.foundries.io/settings/credentials/. You may also verify the credential expiration date.
Tip
It is possible to add scopes for an existing token.
After editing a token, refresh the fioctl access with fioctl login --refresh-access-token.
Doing
fioctl logoutthenfioctl logincan recover from cases where the credentials are badly set.
Updates To etc#
Files created or modified in /etc during runtime are not handled by OSTree during an OTA.
For this reason, set system-wide configs in /usr rather than /etc whenever possible, so that these changes are covered by OTA updates.
Manage files that live in /etc with a systemd service (Adding a new Systemd Startup Service).
The runtime service should handle the needed updates to the /etc files.
Orphan Targets#
In the Factory Overview page, you may notice the ORPHANED column:
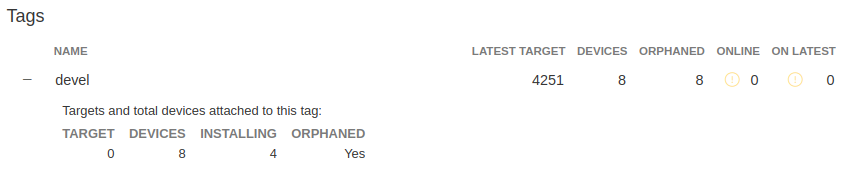
Fig. 56 Factory Overview Snippet#
As seen in Condensed Targets, a device only sees the targets.json
metadata which refers to the tag it is following. An Orphan Target means that
there is at least one device running a Target which is not present in the
Targets list for that tag.
There are some cases where this can happen:
When using Production Targets: A user creates a wave for Target 42 and some devices are updated. The user then cancels the wave, removing Target 42 from the Targets list. A new wave is created for Target 43. Running
fioctl wave statusin this case shows that some devices are running Target 42, which is not present in the Targets list, so it shows as an orphan Target.A device runs an old Target that has been pruned from the Targets list.
A device switches from one tag to another and it is still running a Target version which is not present in the new tag.
Recreating Previous Targets#
By default, aktualizr-lite only installs Targets which are newer than the current one running on the device.
A common requirement during development is to be able to downgrade to a previous stable Target. This can be easily achieved by reverting to the previous commit SHAs that generated this stable Target. However, this may not be ideal as it requires CI build time to actually rebuild the Target.
Users can then use fioctl targets add to recreate a previous Target, using much less CI time than an actual build.
This recreates the Target by re-downloading OSTree or apps contents.
Unfortunately, fioctl targets add does not regenerate the whole target at once.
Like the normal CI flow, apps and OSTree are built separately in a dedicated CI build.
So two sets of commands are necessary to downgrade to a specific OSTree + apps hash.
An example follows:
Device running Target A
New Target B > A is built in CI
Let the device OTA to Target B
Target B updated fine but I would like to go back to Target A
Create a new Target C > B based on A OStree, for example:
$ fioctl targets add --type ostree --tags <new-tag> --src-tag <orig-tag> --targets-creator "Recreate Target A platform build" <machine> <target-a-ostree-hash>
Device then OTA to Target C, which goes back to A OSTree
Note
Similar steps can be taken to recreate a container Target.
See fioctl targets add command usage for more information.
Update FoundriesFactory Manifest Merge Conflict#
When updating an existing FoundriesFactory manifest using the
lmp-tools/scripts/update-factory-manifest script to v95,
a merge conflict is expected.
This is due to the fact that the certificates organization has changed.
For example, the following error:
~/lmp-tools/scripts/update-factory-manifest
New upstream release(s) have been found.
Merging local code with upstream release: <version>
Proceed ? (y/n): y
CONFLICT (modify/delete): conf/keys/uefi/DB.auth deleted in HEAD and modified in <version>.  Version <version> of conf/keys/uefi/DB.auth left in tree.
CONFLICT (modify/delete): conf/keys/uefi/DB.cer deleted in HEAD and modified in <version>.  Version <version> of conf/keys/uefi/DB.cer left in tree.
CONFLICT (modify/delete): conf/keys/uefi/DB.crt deleted in HEAD and modified in <version>.  Version <version> of conf/keys/uefi/DB.crt left in tree.
CONFLICT (modify/delete): conf/keys/uefi/DB.esl deleted in HEAD and modified in <version>.  Version <version> of conf/keys/uefi/DB.esl left in tree.
CONFLICT (modify/delete): conf/keys/uefi/DB.key deleted in HEAD and modified in <version>.  Version <version> of conf/keys/uefi/DB.key left in tree.
CONFLICT (modify/delete): conf/keys/uefi/DBX.auth deleted in HEAD and modified in <version>.  Version <version> of conf/keys/uefi/DBX.auth left in tree.
CONFLICT (modify/delete): conf/keys/uefi/DBX.cer deleted in HEAD and modified in <version>.  Version <version> of conf/keys/uefi/DBX.cer left in tree.
CONFLICT (modify/delete): conf/keys/uefi/DBX.crt deleted in HEAD and modified in <version>.  Version <version> of conf/keys/uefi/DBX.crt left in tree.
CONFLICT (modify/delete): conf/keys/uefi/DBX.esl deleted in HEAD and modified in <version>.  Version <version> of conf/keys/uefi/DBX.esl left in tree.
CONFLICT (modify/delete): conf/keys/uefi/DBX.key deleted in HEAD and modified in <version>.  Version <version> of conf/keys/uefi/DBX.key left in tree.
CONFLICT (modify/delete): conf/keys/uefi/KEK.auth deleted in HEAD and modified in <version>.  Version <version> of conf/keys/uefi/KEK.auth left in tree.
CONFLICT (modify/delete): conf/keys/uefi/KEK.cer deleted in HEAD and modified in <version>.  Version <version> of conf/keys/uefi/KEK.cer left in tree.
CONFLICT (modify/delete): conf/keys/uefi/KEK.crt deleted in HEAD and modified in <version>.  Version <version> of conf/keys/uefi/KEK.crt left in tree.
CONFLICT (modify/delete): conf/keys/uefi/KEK.esl deleted in HEAD and modified in <version>.  Version <version> of conf/keys/uefi/KEK.esl left in tree.
CONFLICT (modify/delete): conf/keys/uefi/KEK.key deleted in HEAD and modified in <version>.  Version <version> of conf/keys/uefi/KEK.key left in tree.
CONFLICT (modify/delete): conf/keys/uefi/PK.auth deleted in HEAD and modified in <version>.  Version <version> of conf/keys/uefi/PK.auth left in tree.
CONFLICT (modify/delete): conf/keys/uefi/PK.cer deleted in HEAD and modified in <version>.  Version <version> of conf/keys/uefi/PK.cer left in tree.
CONFLICT (modify/delete): conf/keys/uefi/PK.crt deleted in HEAD and modified in <version>.  Version <version> of conf/keys/uefi/PK.crt left in tree.
CONFLICT (modify/delete): conf/keys/uefi/PK.esl deleted in HEAD and modified in <version>.  Version <version> of conf/keys/uefi/PK.esl left in tree.
CONFLICT (modify/delete): conf/keys/uefi/PK.key deleted in HEAD and modified in <version>.  Version <version> of conf/keys/uefi/PK.key left in tree.
CONFLICT (modify/delete): conf/keys/uefi/PKnoauth.auth deleted in HEAD and modified in <version>.  Version <version> of conf/keys/uefi/PKnoauth.auth left in tree.
Automatic merge failed; fix conflicts and then commit the result.

Unable to perform automatic update.  Restoring previous state.

One of these last few commits is probably causing a conflict:
72f5f8429baeeb39d3f7d2e365cd1b731b641cc0 (HEAD -> main) Add bblayers-factory conf
19fabe2c3eb041d19f07e9fac89106ce7afe4f46 Add overrides meta layer
5c5376a90509b319de376bc18637ab896a1f480a Add factory-keys
For example, for a FoundriesFactory created with v94.1 and updated to v95, the merge conflicts might be such as:
Changes to be committed:
   modified:   ../../Dockerfile
   modified:   ../../conf/bblayers-base.inc
   modified:   ../../conf/bblayers-bsp.inc
   new file:   ../../conf/keys/uefi/noKEK.auth
   new file:   ../../conf/keys/uefi/noKEK.esl
   new file:   ../../conf/keys/uefi/noPK.auth
   new file:   ../../conf/keys/uefi/noPK.esl
   modified:   ../../lmp-base.xml
   modified:   ../../lmp-bsp.xml
   modified:   ../../setup-environment-internal

Unmerged paths:
(use "git add/rm <file>..." as appropriate to mark resolution)
   deleted by us:   ../../conf/keys/uefi/DB.auth
   deleted by us:   ../../conf/keys/uefi/DB.cer
   deleted by us:   ../../conf/keys/uefi/DB.crt
   deleted by us:   ../../conf/keys/uefi/DB.esl
   deleted by us:   ../../conf/keys/uefi/DB.key
   deleted by us:   ../../conf/keys/uefi/DBX.auth
   deleted by us:   ../../conf/keys/uefi/DBX.cer
   deleted by us:   ../../conf/keys/uefi/DBX.crt
   deleted by us:   ../../conf/keys/uefi/DBX.esl
   deleted by us:   ../../conf/keys/uefi/DBX.key
   deleted by us:   ../../conf/keys/uefi/KEK.auth
   deleted by us:   ../../conf/keys/uefi/KEK.cer
   deleted by us:   ../../conf/keys/uefi/KEK.crt
   deleted by us:   ../../conf/keys/uefi/KEK.esl
   deleted by us:   ../../conf/keys/uefi/KEK.key
   deleted by us:   ../../conf/keys/uefi/PK.auth
   deleted by us:   ../../conf/keys/uefi/PK.cer
   deleted by us:   ../../conf/keys/uefi/PK.crt
   deleted by us:   ../../conf/keys/uefi/PK.esl
   deleted by us:   ../../conf/keys/uefi/PK.key
   deleted by us:   ../../conf/keys/uefi/PKnoauth.auth
Solution:
The solution is to manually merge the changes from lmp-manifest
with the following goals in mind:
Removal of all
lmp-manifest/conf/keysafter the merge (since that is done on new factories)Creation of the missing certificate files by hand and having them available in the
lmp-manifest/factory-keysfolder.
As the error may vary, there is no set of commands to fit all the cases. For the example above, the following steps were used to solve the conflict:
$ git rm -rf conf/keys/
$ git commit
However, remember the list of goals: no conf/keys folder should be present after
the merge; all missing keys should be created.
Note
You can use the script /lmp-tools/scripts/rotate_ci_keys.sh
to re-generate all the keys.
If any key is missing, a new file will be created and
you can commit only that file.
Please remember to not override any existing key without the additional steps!
For example, if you decide to use /lmp-tools/scripts/rotate_ci_keys.sh
to generate a new file for each key, you can git add any freshly created file
and git restore any modified file.
When rotating an existing key, it is critical to make sure the boot sequence is updated accordingly as the new key value might impact the whole system.
Jailhouse support in LmP is removed#
Jailhouse support in LmP is removed. In some rare cases, when a factory is created during a specific period of time, it might face the following error during the migration:
`
Parsing recipes...ERROR: ParseError at /srv/oe/build/conf/../../layers/meta-subscriber-overrides/recipes-samples/images/lmp-factory-image.bb:30: Could not include required file recipes-samples/images/lmp-feature-jailhouse.inc
ERROR: Parsing halted due to errors, see error messages above
`
Solution:
Remove the following line from the meta-subscriber-overrides/recipes-samples/images/lmp-factory-image.bb file.
require ${@bb.utils.contains('MACHINE_FEATURES', 'jailhouse', 'recipes-samples/images/lmp-feature-jailhouse.inc', '', d)}