Foundries.io REST API
Foundries.io implements a REST API that allows users to interact with their FoundriesFactory and devices. This section shows examples of how to use the REST API with cURL, a command-line tool for transferring data using various network protocols.
To follow this section, it is important to have:
- Completed the Getting started until the Flashing Your Device section.
Creating Token
To interact with the Foundries.io API, you need to create a token.
Go to Tokens and create a new Api Token by clicking on + New Token.
Complete with a Description and the Expiration date and select next.
For this tutorial, check the Use for tools like fioctl box and select your Factory.
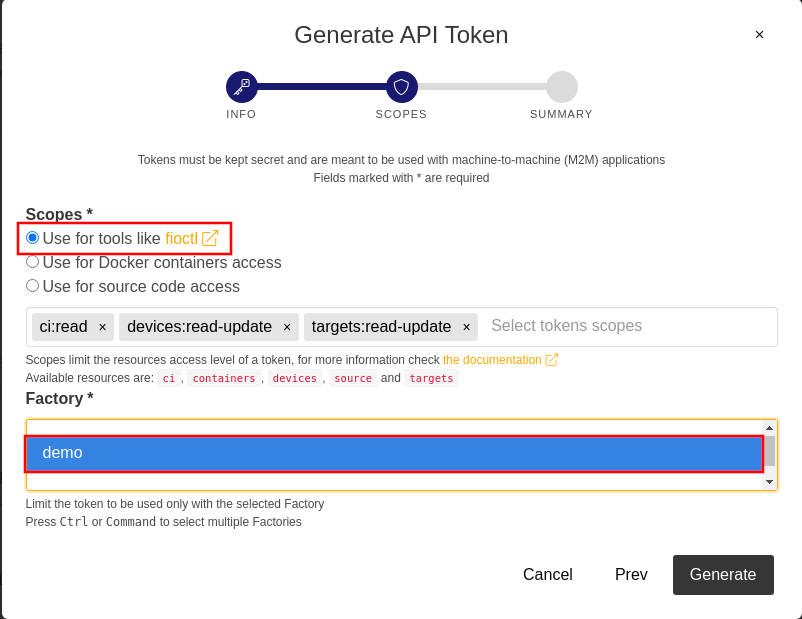
Fig. 24 Token for REST API
Save the output of this command to your copy buffer. This is your <API_TOKEN> value.
Getting Started
The Foundries.io API includes a complete OpenAPI definition. To get started, configure your host terminal with the variables below:
export FACTORY=<FACTORY>
export TOKEN=<API_TOKEN>
Note
Make sure to replace <FACTORY> with the Factory name and <API_TOKEN> with the token created in the last step.
Device List
This function returns a list of devices registered in your Factory. The HTTP response includes the same data from the Devices tab of the Factory. You can find this resource’s documentation at Foundries.io API under devices.
Using the terminal, run:
curl -H "OSF-TOKEN: $TOKEN" https://api.foundries.io/ota/devices/
Example Output:
"devices": [
  {
        "uuid": "f4120660-ffbf-483f-b2ca-a6186da467f4",
        "owner": "5e13232f73927550af883e7b",
        "factory": "getting-started",
        "name": "device-01",
        "created-at": "2021-11-11T14:17:50+00:00",
        "last-seen": "2021-11-11T14:17:57+00:00",
        "ostree-hash": "cfacf42873aa06fbf53d7b1bfcb72032f21631b068620e575696ab2ab0670efd",
        "target-name": "raspberrypi3-64-lmp-2",
        "current-update": "",
        "device-tags": [
          "devel"
        ],
        "tag": "devel",
        "docker-apps": [],
        "network-info": {
          "hostname": "raspberrypi3-64",
          "local_ipv4": "192.168.15.13",
          "mac": "b8:27:eb:ca:78:75"
        },
        "up-to-date": true,
        "public-key": "-----BEGIN PUBLIC KEY-----\nMFkwEwYHKoZIzj0CAQYIKoZIzj0DAQcDQgAE2l3TY/Gu8W+euAA8bVufhxmCK0YR\ngt3B8XPXGS4rVRD3jfjjf7cCJQ4GLtvs+phTgeLiRJwTyWzsFZGYxqN1aA==\n-----END PUBLIC KEY-----\n",
        "is-prod": false,
        "is-wave": false
      }
    ],
    "page": 1,
        "pages": 1,
        "limit": 1000,
    "total": 1
  }
Targets List
This function returns a list of your Factory targets. The HTTP response includes the same data from the Targets tab of the Factory. You can find this resource’s documentation at Foundries.io API under factories.
Using the terminal, run:
curl -H "OSF-TOKEN: $TOKEN" https://api.foundries.io/ota/factories/$FACTORY/targets/
Example Output:
{
  "raspberrypi3-64-lmp-3": {
    "custom": {
      "arch": "aarch64",
      "cliUploaded": false,
      "createdAt": "2021-07-28T20:40:39Z",
      "hardwareIds": [
        "raspberrypi3-64"
      ],
      "image-file": "lmp-factory-image-raspberrypi3-64.wic.gz",
      "lmp-manifest-sha": "b7d11e4f7d20f1fae63e1f54d8b5f48557fa40c1",
      "meta-subscriber-overrides-sha": "7de1123998c9b362df278132fde8fccb57215647",
      "name": "raspberrypi3-64-lmp",
      "tags": [
        "master"
      ],
      "targetFormat": "OSTREE",
      "updatedAt": "2021-07-28T20:40:39Z",
      "uri": "https://ci.foundries.io/projects/getting-started/lmp/builds/3",
      "version": "3"
    },
    "hashes": {
      "sha256": "f190733c576920a203acd40d8df1cb82135aaf50f0b2c5fa8402745d73a633b3"
    },
    "length": 0
  },
  "raspberrypi3-64-lmp-2": {
    "custom": {
      "arch": "aarch64",
      "cliUploaded": false,
      "createdAt": "2021-07-28T20:15:29Z",
      "hardwareIds": [
        "raspberrypi3-64"
      ],
      "image-file": "lmp-factory-image-raspberrypi3-64.wic.gz",
      "lmp-manifest-sha": "b6483a7b0bd666b5b871662fa46477cdeede80f2",
      "meta-subscriber-overrides-sha": "7de1123998c9b362df278132fde8fccb57215647",
      "name": "raspberrypi3-64-lmp",
      "tags": [
        "devel"
      ],
      "targetFormat": "OSTREE",
      "updatedAt": "2021-07-28T20:15:29Z",
      "uri": "https://ci.foundries.io/projects/getting-started/lmp/builds/2",
      "version": "2"
    },
    "hashes": {
      "sha256": "cfacf42873aa06fbf53d7b1bfcb72032f21631b068620e575696ab2ab0670efd"
    },
    "length": 0
  }
}
Configure Device
It is also possible to send configuration files to your device or fleet. You can find more about it in the tutorial section: Dynamic Configuration File.
Assuming you want to send a configuration file named as app.config to your device:
app.config:
[page]
url = "https://foundries.io/"
First, you have to convert the file contents into properly escaped JSON string:
[page]\nurl = \"https://foundries.io/\"\n"
Now use the command below to create the API_DATA variable.
Note that the file content is on value and the file name on name.
export API_DATA='{ "reason": "API test", "files": [{"name":"app.config","unencrypted":true,"value":"[page]\nurl = \"https://foundries.io/\"\n"}]}'
Define the variable DEVICE_NAME and configure your device using cURL with -X PATCH:
export DEVICE_NAME=<DEVICE_NAME>
curl --data "$API_DATA" -H "Content-Type: application/json" -H "OSF-TOKEN: $TOKEN" -X PATCH https://api.foundries.io/ota/devices/$DEVICE_NAME/config/
Example Output:
{
  "created-at": "2021-11-11T15:59:07",
  "applied-at": null,
  "reason": "API test",
  "files": [
    {
      "name": "app.config",
      "value": "[page]\nurl = \"https://foundries.io/\"\n",
      "unencrypted": true
    }
  ]
}
After some time, fioconfig receives all the changes and you can find the configuration file
on your device at /var/run/secrets/.
sudo cat /var/run/secrets/app.config
Example Output:
[page]
url = "https://foundries.io/"
Enabling/Disabling Application
It is also possible to configure what application or tag the device should use.
For example, to enable the shellhttpd application, you have to send a JSON file similar to:
{
  "name": "z-50-fioctl.toml",
  "on-changed": [
    "/usr/share/fioconfig/handlers/aktualizr-toml-update"
  ],
  "unencrypted": true,
      "value": "\n[pacman]\n  compose_apps = \"shellhttpd\"\n"
}
The command below adds the json file into the API_DATA variable:
export API_DATA='{ "reason": "API test", "files": [{"name":"z-50-fioctl.toml","on-changed":["/usr/share/fioconfig/handlers/aktualizr-toml-update"],"unencrypted":true,"value":"\n[pacman]\n compose_apps = \"shellhttpd\"\n"}]}'
Define the variable DEVICE_NAME and configure your device using cURL with -X PATCH:
export DEVICE_NAME=<DEVICE_NAME>
curl --data "$API_DATA" -H "Content-Type: application/json" -H "OSF-TOKEN: $TOKEN" -X PATCH https://api.foundries.io/ota/devices/$DEVICE_NAME/config/
Example Output:
{"created-at": "2021-11-10T19:02:30", "applied-at": null, "reason": "API test", "files": [{"name": "wireguard-client", "value": "enabled=0\n\npubkey=J0H7CMG10TsTEai2Ui35KV0fb5oaJ8qd+mnWgIu091s=", "unencrypted": true}, {"name": "z-50-fioctl.toml", "on-changed": ["/usr/share/fioconfig/handlers/aktualizr-toml-update"], "value": "\n[pacman]\n compose_apps = \"shellhttpd\"\n", "unencrypted": true}]}
Finding More about REST API
Once logged into http://app.foundries.io, you may interact and play with the REST API from your browser at http://api.foundries.io/ota.
1 - Click on the operation to test. That shows the Try it out option. Click on it.
2 - Customize parameters as you like.
3 - Execute to test.
4 - Once it is executed, it shows you a cURL command reference.
5 - Finally, you can also check the response.
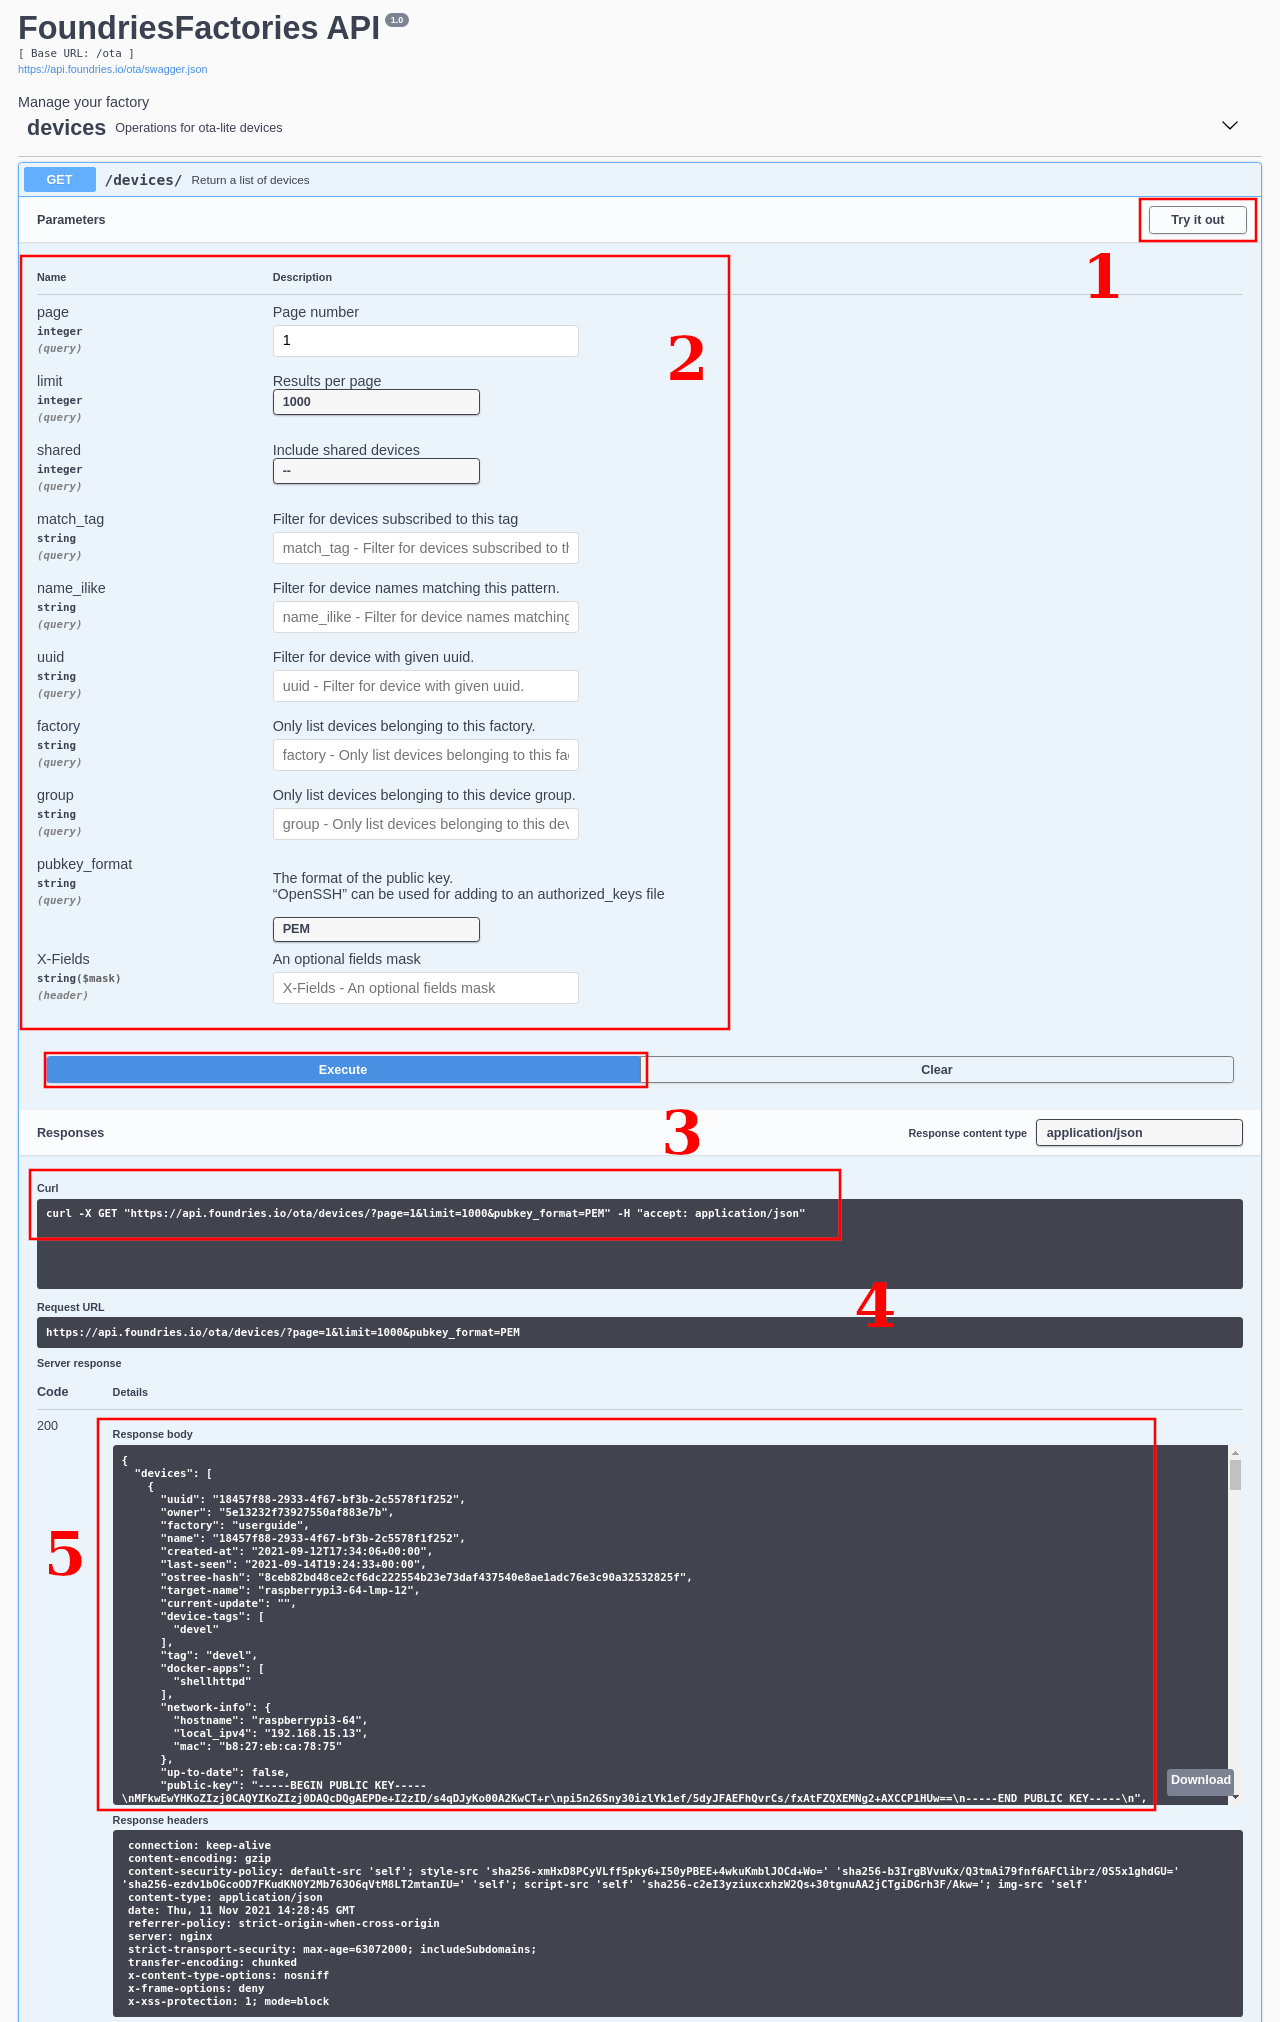
Fig. 25 Foundries.io REST API page illustration
This is a very interesting way to explore the Foudries.io REST API and all its possibilities.