Flash your Device
Note
The initial FoundriesFactory set up and build can take more than 30 minutes to complete. How to keep track of the current build status can be found at the Watch Your Build page. While you wait, please take this time to follow this introductory tutorial.
Prerequisites and Prework
- Capable of booting from eMMC (recommended if available)
- Or capable of booting from a suitable microSD Card
Wired or WiFi network with internet access.
- Ethernet cable (if choosing Wired)
- Console access to your hardware via display/keyboard or serial (if choosing WiFi)
Download LmP system image
When you trigger a build, it produces build artifacts as an output which can be downloaded from the Targets tab of your factory, as described in Watch Your Build.
Navigate to the Targets section of your Factory.
Click the latest Targets with the
platform-develTrigger.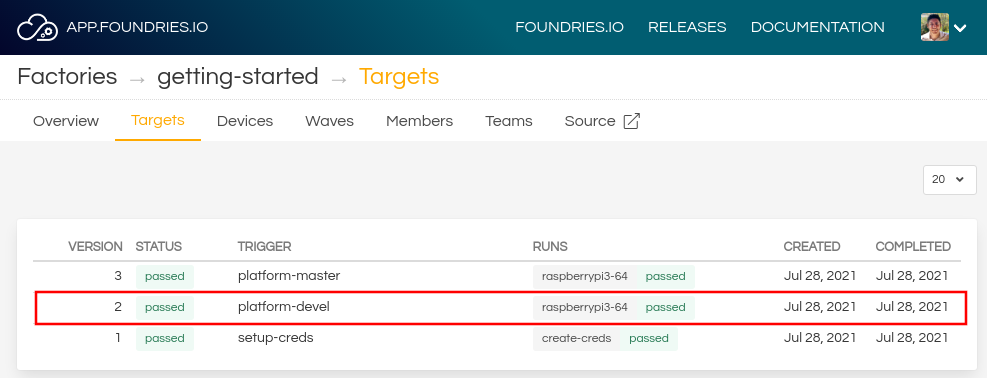
Expand the run in the Runs section which corresponds with the name of the board and download the Factory image for that machine.
E.g:lmp-factory-image-<machine_name>.wic.gz
Flash LmP system image
Note
If you are developing on a platform that has eMMC available such as the NXP iMX8MM-EVK, it is highly recommended that you boot from eMMC rather than SD, and is enforced by default. Read the Supported Machines section for specific details on flashing your system-image using the vendor provided tools.
Determine the disk you want to flash by finding the device with the
SIZEthat matches your SD card in the list below. Be sure to ignore partitions (whereTYPEispart). Save theNAMEfor your SD card device to be used in a later step as the disk path. e.g:/dev/mmcblk0:lsblk -po +MODELExample Output:
lsblk -po +MODEL
NAME               MAJ:MIN  RM    SIZE  RO  TYPE MOUNTPOINT    MODEL
/dev/mmcblk0       179:0     0   29.8G   0  disk
├─/dev/mmcblk0p1   179:1     0   41.6M   0  part /mnt/boot
└─/dev/mmcblk0p2   179:2     0   29.8G   0  part /mnt/otaroot
/dev/zram0         254:0     0     26G   0  disk /out
/dev/nvme0n1       259:0     0  953.9G   0  disk               SSDPEKKF010T8 NVMe INTEL 1024GB
Flash the disk.
Replace<system-image>Replace/dev/mmcblk<X>with your chosen disk path.
gunzip -c <system-image> | sudo dd of=/dev/mmcblk<X> bs=4096k iflag=fullblock oflag=direct status=progress
Determine the disk you want to flash by finding the device with the
SIZEthat matches your SD card in the list below. Be sure to ignore partitions (lines without the * in theSIZE). Save theIDENTIFIERfor your SD card device to be used in a later step as the disk path. e.g:/dev/disk3:diskutil listExample Output:
diskutil list
/dev/disk3 (internal, physical):
   #:     TYPE NAME                  SIZE        IDENTIFIER
   0:     FDisk_partition_scheme     *15.5 GB    disk3
   1:     Windows_FAT_32 boot         45.7 MB    disk3s1
   2:     Linux                       15.5 GB    disk3s2
Flash the disk.
Replace<system-image>Replace/dev/disk<X>with your chosen disk path.
Warning
It may be necessary to unmount the disk if macOS has auto-mounted it like so:
sudo diskutil unmount /dev/disk<X>gunzip -c <system-image> | sudo dd of=/dev/disk<X> bs=4096k
Windows has no dd like tool built into the operating system to flash
your image to disk. In this case, we recommend you download and use either
Win32 Disk Imager or Rufus.
Note
Your system image is in a compressed wic.gz format. To follow these next steps, you must extract it using a tool like 7zip which will leave you with a .wic image file.
Using Rufus
- Download and run Rufus.
- Select your disk.
- SELECT your
<system-image>. - START the flash procedure.
Using Win32 Disk Imager
- Download and run Win32 Disk Imager as Administrator.
- Click the blue folder icon.
- Select your
<system-image> - Select your disk via the Device dropdown.
- Click Write
- Wait for the image to finish writing, and a Write Successful dialog will appear.
Boot Device and Connect to the Network
Ethernet (Recommended)
Ethernet works out of the box if a DHCP server is available on the local network.
- Connect an Ethernet cable to the board.
- Remove the SD card from your computer, and insert it into the board.
- Apply power to the board.
Your board will connect to the network via Ethernet and will be ready to connect within a minute or two of booting.
WiFi
The LmP uses nmcli and NetworkManager to manage network
connectivity. Once you have gained shell access to the device, you can add a new
WiFi SSID to connect to by using nmcli:
sudo nmcli device wifi connect NETWORK_SSID password NETWORK_PASSWORD
Access via Serial
If you are starting without any network connectivity that could give you shell access to your device, you will need to connect via serial to execute the command. You may need to refer to your hardware vendor’s documentation on serial access.
Access interactively
If your device has a video interface, you can attach it to a display, plug in a USB Keyboard and execute the command interactively. Be sure to log out from your shell session after completion when using this method.
If you don’t have Ethernet connectivity, you can connect to a WiFi network by temporarily enabling the UART console on your Raspberry Pi and running a command to connect to your WiFi network.
Note
While a hardware serial port is available, enabling it unfortunately requires this device to run at significantly reduced speeds, and causes serious Bluetooth instability. Make sure to disable the console and reboot before proceeding.
You’ll need a 3.3 volt USB to TTL serial adapter, such as this Adafruit USB to TTL Serial Cable.
Mount the micro SD card containing the SD image you flashed on your workstation PC.
Edit the
config.txtfile on the VFATboot/partition, adding a new line with the following content:enable_uart=1
Safely unmount the micro SD card, remove it from your workstation, and insert it into the Raspberry Pi.
Connect the adapter to your Raspberry Pi’s UART and to your workstation computer via USB, e.g. by following this Adafruit guide.
Connect a serial console program on your workstation to the adapter, and power on the Raspberry Pi.
When prompted, log in via the console. The default username is
fio, and the default password isfio. You should change the password before connecting to the network.Connect to the network using the following command:
sudo nmcli device wifi connect NETWORK_SSID password NETWORK_PASSWORD
Where
NETWORK_SSIDis your WiFi network’s SSID, andNETWORK_PASSWORDis the password.Safely shut down the Raspberry Pi, re-mount the SD card on your host workstation, and delete the line you added to
config.txt.Unmount the SD card from your workstation, insert it into the Raspberry Pi, and reboot it.
Your board will connect to the network you’ve saved after rebooting. You can now log in using SSH.
Log in via SSH
Use fio as the username and machine-name.local as the
hostname:
ssh fio@<machine-name>.local
The default password is fio; we recommend changing it once logged in.
Note
Your device hostname will be defaulted to the value of the machine: key
value from your factory-config.yml Read the Supported Machines
section for a list of supported hardware and their MACHINE value.
Here are some examples:
raspberrypi3-64.localimx8mmevk.localbeaglebone-yocto.localintel-corei7-64.localFor this to work, your PC needs to support zeroconf the hostname must be otherwise unclaimed. If this doesn’t work, you can also log in by IP address. See Troubleshooting below for advice.
Troubleshooting
If the above methods to connect your device to the network don’t work, try one of the following.
- Temporarily enable and connect to the UART (see directions above in the WiFi section) and determine available IP addresses with:
Ethernet:
ip addr show eth0 scope global
WiFi:
ip addr show wlan0 scope global
- Then connect by IP address:
ssh fio@<ip-address>
- List connected devices and their local IP addresses on your network router’s administrative interface, and log in by IP address as above.