Secure Boot on IMX
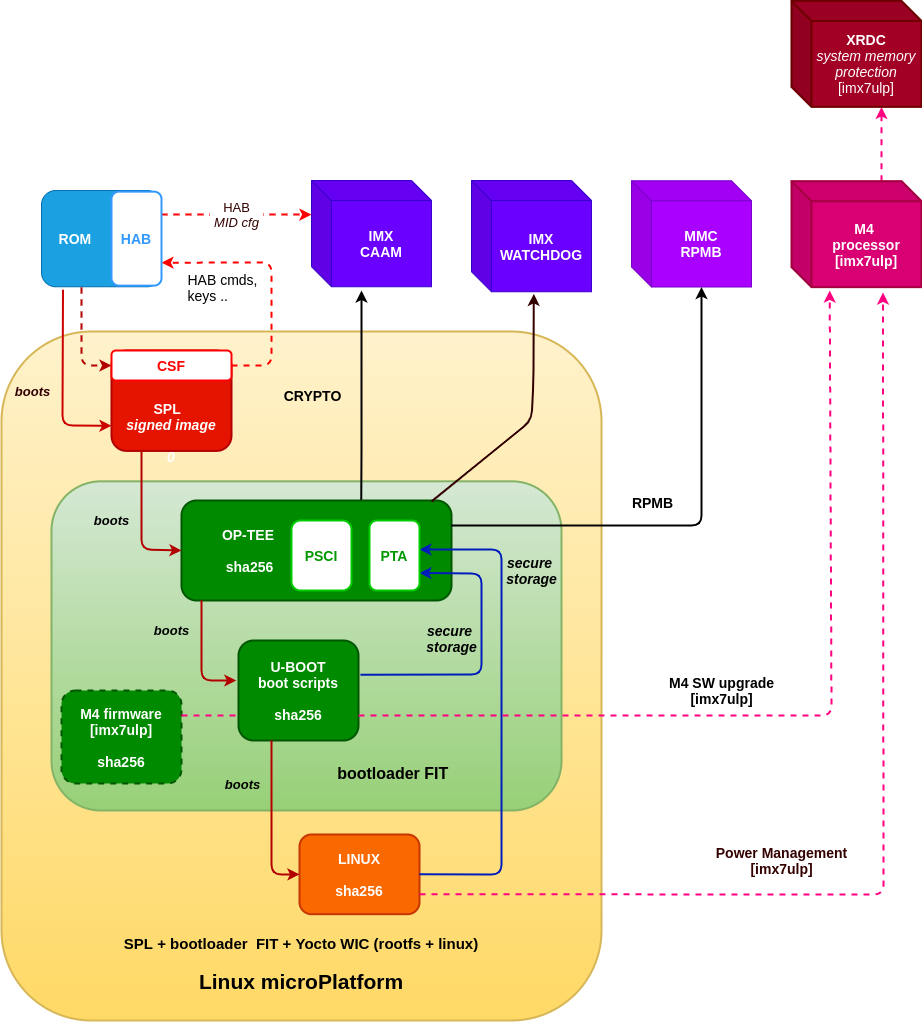
On the IMX platforms, secure boot is implemented via the High Availability Boot component of the on-chip ROM. The ROM is responsible for loading the initial program image, the bootloader; HAB then enables the ROM to authenticate it using digital signatures.
HAB also provides a mechanism to establish a root of trust for the remaining software components and establishes a secure state - the close state - on the IMX IC secure state machine in hardware.
Our implementation
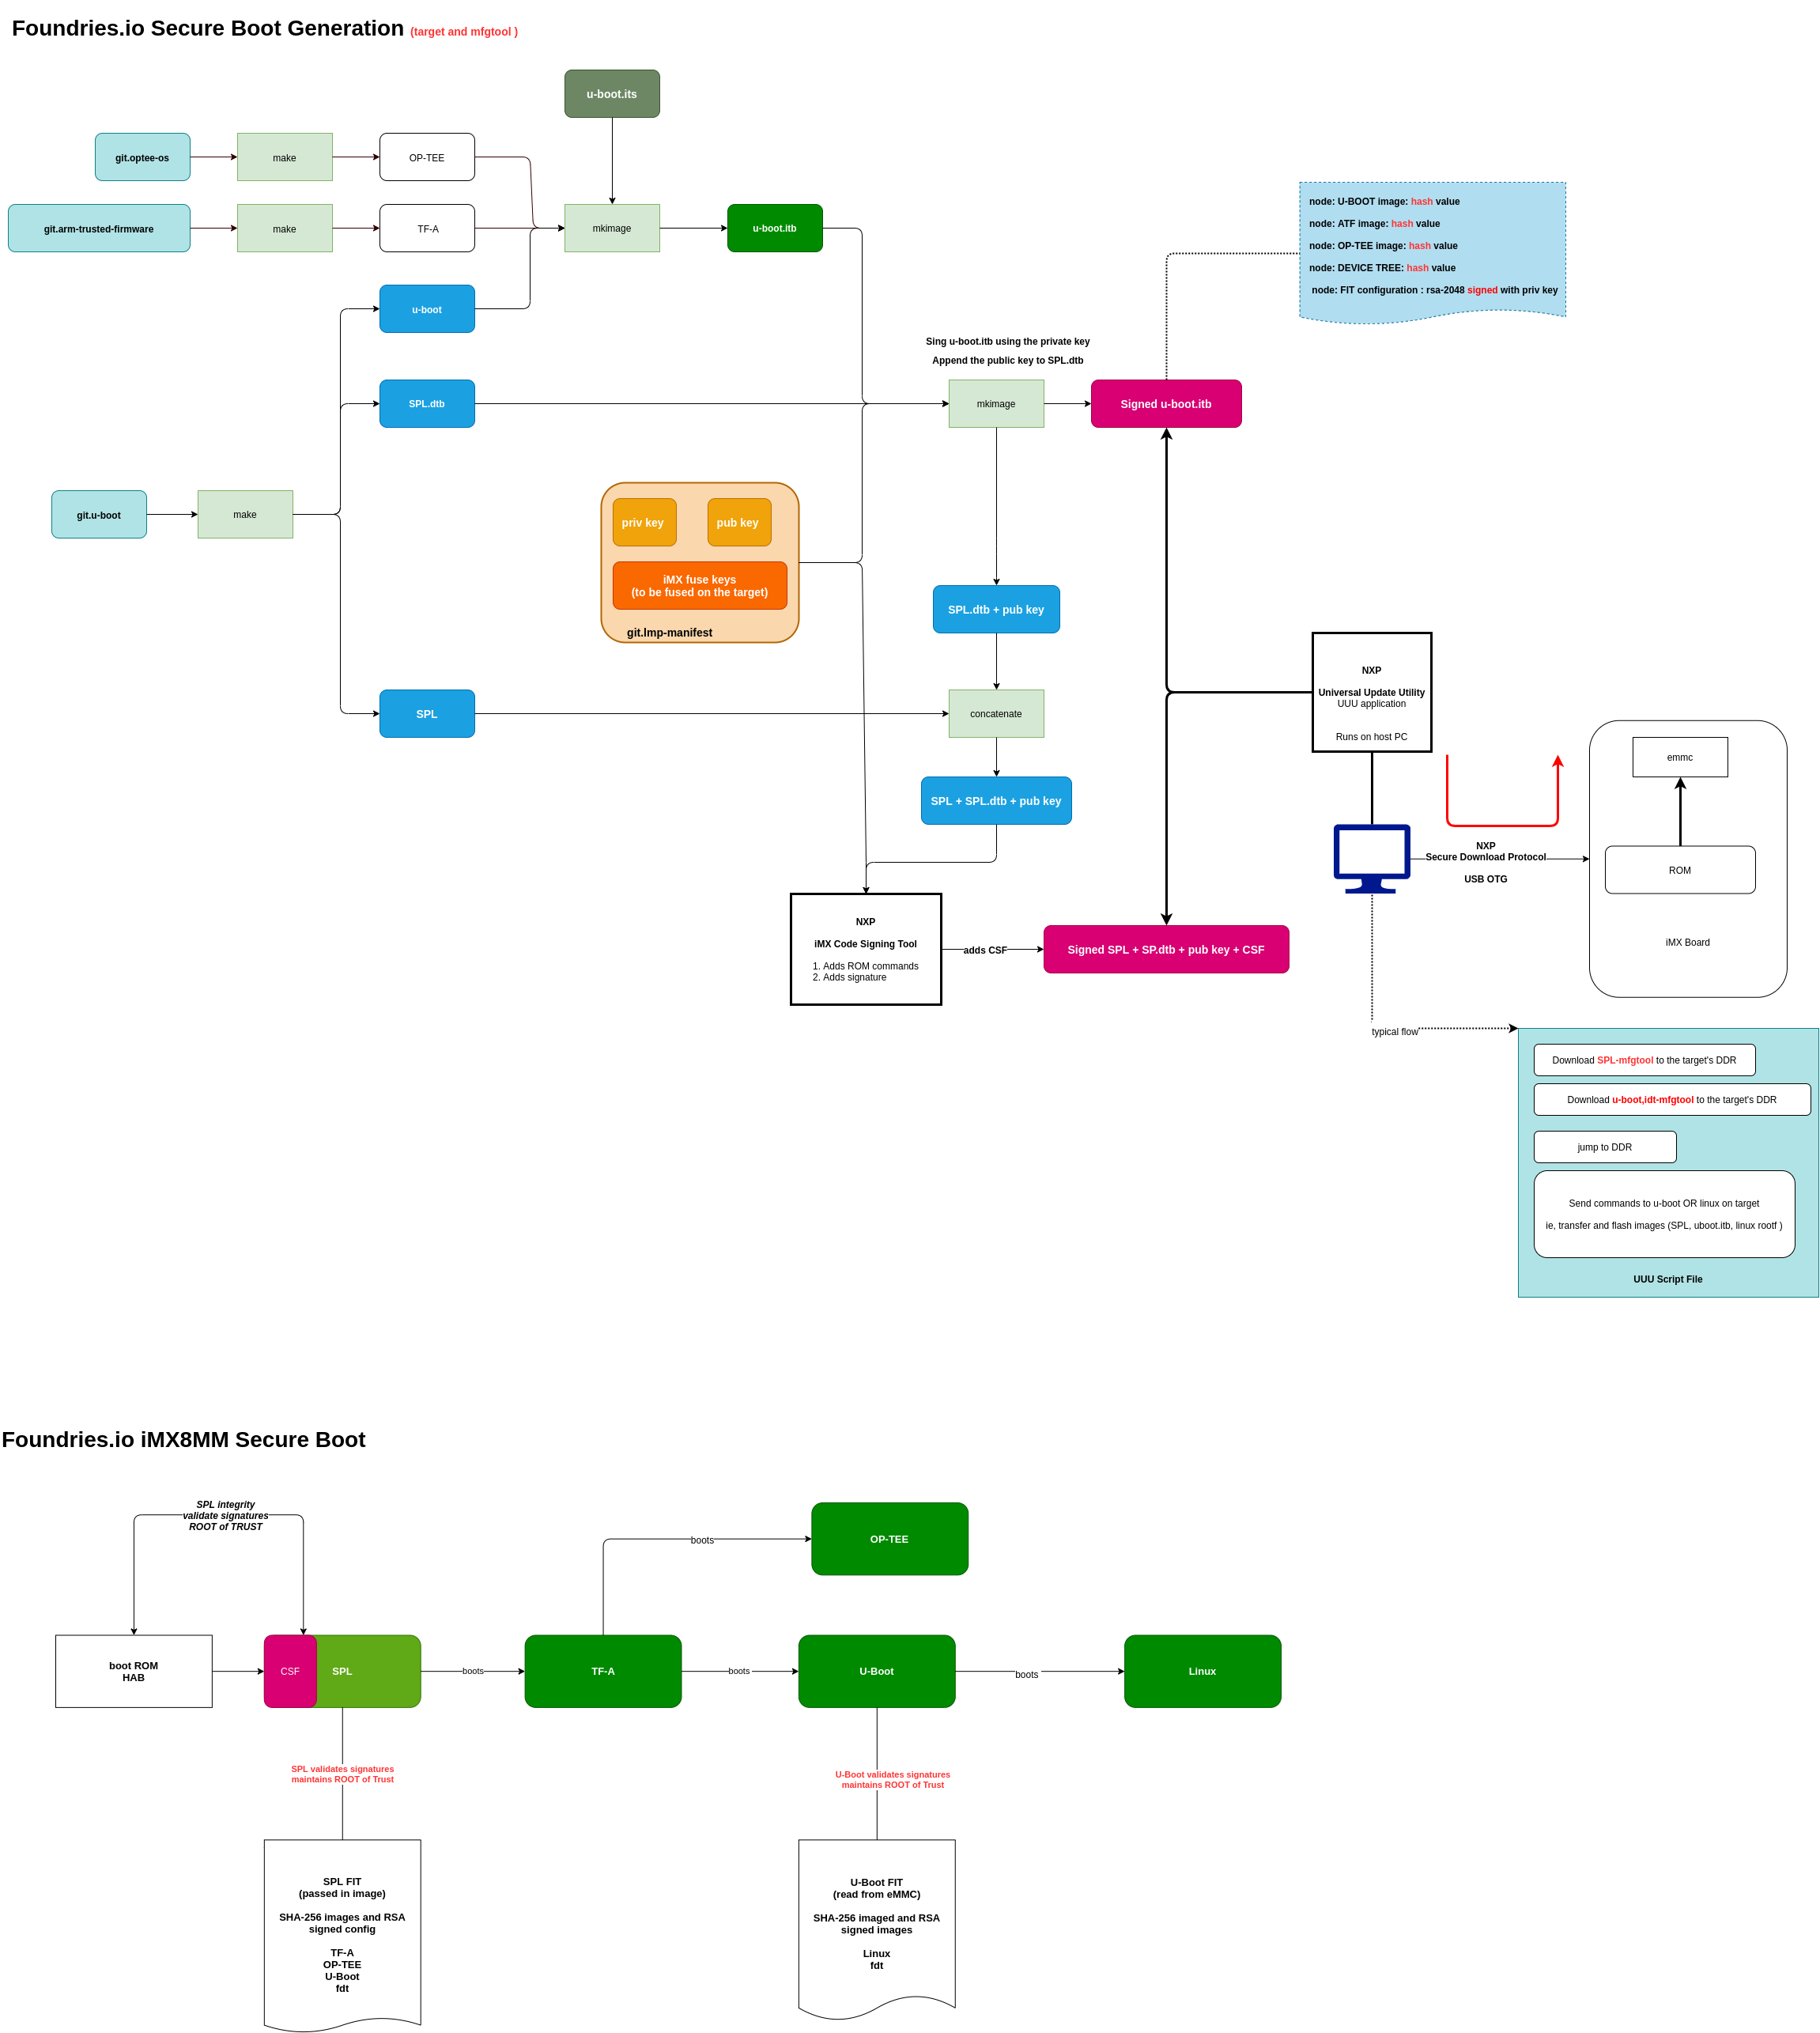
Foundries.io LmP uses U-Boot as the bootloader with SPL being its first stage loader. Our secure boot implementation will put the IC in a secure state accepting only signed SPL firmware.
SPL then boots the trusted execution environment - OP-TEE - where we run an ‘early’ trusted application, fiovb - Foundries.io verified Boot. This trusted application provides secure access to the Replay Protected Memory Block partition in MMC which is used to store keys, firmware and rollback information.
OP-TEE also prepares the next stage bootloader - U-Boot - and generates an overlay DTS for the Linux kernel consumption. Then it jumps to U-Boot which controls the M4 firmware upgrade process using the fiovb trusted application. U-boot also implements the fiovb command to validate the trusted application functionality.
U-boot then jumps to the kernel entry point.
Therefore a system like the one described which boots without TF-A would look as follows:
Note
Systems using TF-A (ie, imx8m) would be slightly different.
See the following diagrams describing the secure boot sequence and succinctly the Yocto Project meta layer’s configuration for imx8mm based platforms with TF-A:
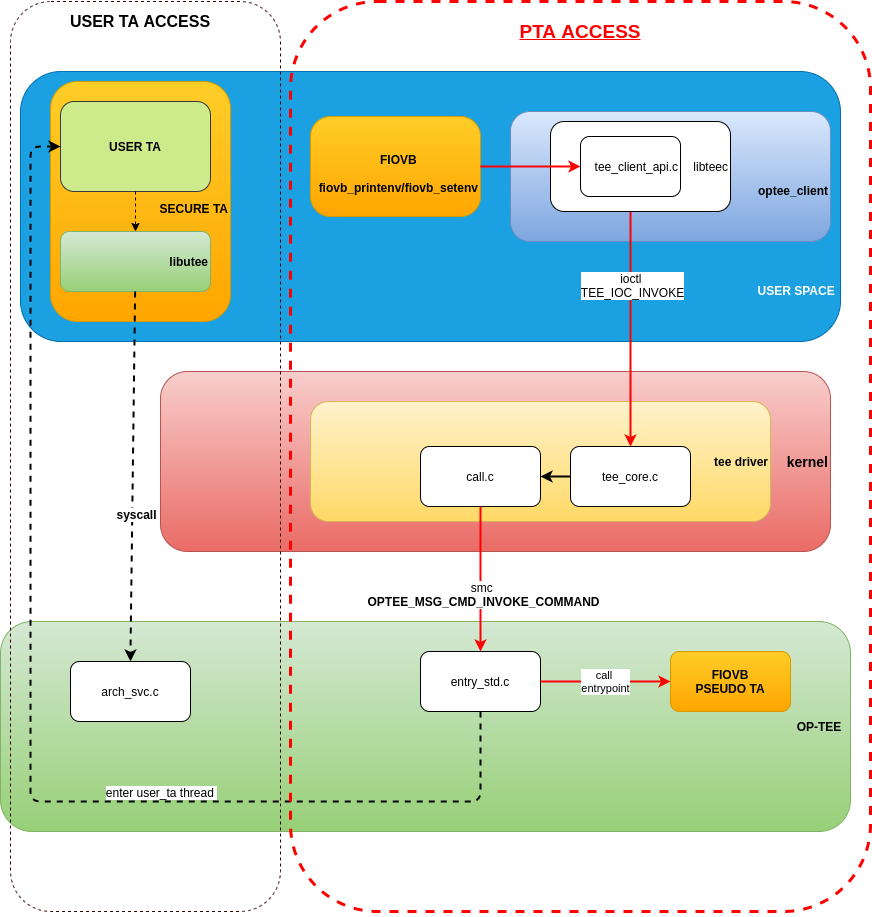
The communication path to gain access from userland via the pseudo trusted application (PTA) to RPMB follows the OP-TEE standard convention for PTAs as the image below describes: userland uses libteec to issue an ioctl to the linux tee driver which in turn transitions the processor to its secure state and calls the application entrypoint.
Notice the distinction had we decided to implement FIOVB as a secured user application instead of a PTA.
HAB Architecture Overview
HAB authentication is based on public key cryptography using the RSA algorithm in which image data is signed offline using a series of private keys. The resulting signed image data is then verified on the i.MX processor using the corresponding public keys.
This key structure is known as a PKI tree; super root keys, or SRK, are components of the PKI tree: HAB relies on a table of the public SRKs to be hashed and placed in fuses on the target. The i.MX Code Signing Tool (CST) is used to generate the HABv4 signatures for images using the PKI tree data and SRK table.
On the target, HAB evaluates the SRK table included in the signature by hashing it and comparing the result to the SRK fuse values: if the SRK verification is successful, this establishes the root of trust, and the remainder of the signature can be processed to authenticate the image.
How to Secure the Platform
The first step is to generate the PKI tree and commit the fuse table to the hardware.
Warning
Once the fuses have been programmed they can’t be modified.
Please refer to NXP’s Secure Boot Using HABv4 Guide for a detailed description on how to generate the PKI tree.
For development purposes, we keep iMX HAB4 sample keys and certificates at lmp-tools/security/imx_hab4. The fuse table can be inspected by executing the print_fuses script in that same directory. The output should be:
0xEA2F0B50
0x871167F7
0xF5CECF5D
0x364727C3
0x8DD52832
0xF158F65F
0xA71BBE78
0xA3AD024A
The Security Reference Manual for your specific SoC will indicate which fuses need to be programed with the SRK fuse information.
i.MX7ULP fusing
On the i.MX7ULP the A7 fuses are stored in the fuse bank 5, words 0 to 7 and the M4 fuses are stored in the fuse bank 6, words 0 to 7.
To program the A7 fuses you could use U-Boot’s fuse command as follows:
=> fuse prog 5 0 0xEA2F0B50
=> fuse prog 5 1 0x871167F7
=> fuse prog 5 2 0xF5CECF5D
=> fuse prog 5 3 0x364727C3
=> fuse prog 5 4 0x8DD52832
=> fuse prog 5 5 0xF158F65F
=> fuse prog 5 6 0xA71BBE78
=> fuse prog 5 7 0xA3AD024A
For the M4 fuses it would look like this:
=> fuse prog 6 0 0xEA2F0B50
=> fuse prog 6 1 0x871167F7
=> fuse prog 6 2 0xF5CECF5D
=> fuse prog 6 3 0x364727C3
=> fuse prog 6 4 0x8DD52832
=> fuse prog 6 5 0xF158F65F
=> fuse prog 6 6 0xA71BBE78
=> fuse prog 6 7 0xA3AD024A
Alternatively, use the kernel to program the A7 fuses using SDP via NXP’s Universal Update Utility with a script as follows (replace @@MACHINE@@ with your machine name):
uuu_version 1.0.1

SDP: boot -f SPL-@@MACHINE@@

SDPU: delay 1000
SDPU: write -f u-boot-@@MACHINE@@.itb
SDPU: jump

FB: ucmd fuse prog -y 5 0 0xEA2F0B50
FB: ucmd fuse prog -y 5 1 0x871167F7
FB: ucmd fuse prog -y 5 2 0xF5CECF5D
FB: ucmd fuse prog -y 5 3 0x364727C3
FB: ucmd fuse prog -y 5 4 0x8DD52832
FB: ucmd fuse prog -y 5 5 0xF158F65F
FB: ucmd fuse prog -y 5 6 0xA71BBE78
FB: ucmd fuse prog -y 5 7 0xA3AD024A

FBK: DONE
And the following script would work for setting the M4 fuses:
uuu_version 1.0.1

SDP: boot -f SPL-@@MACHINE@@

SDPU: delay 1000
SDPU: write -f u-boot-@@MACHINE@@.itb
SDPU: jump

FB: ucmd fuse prog -y 6 0 0xEA2F0B50
FB: ucmd fuse prog -y 6 1 0x871167F7
FB: ucmd fuse prog -y 6 2 0xF5CECF5D
FB: ucmd fuse prog -y 6 3 0x364727C3
FB: ucmd fuse prog -y 6 4 0x8DD52832
FB: ucmd fuse prog -y 6 5 0xF158F65F
FB: ucmd fuse prog -y 6 6 0xA71BBE78
FB: ucmd fuse prog -y 6 7 0xA3AD024A

FBK: DONE
i.MX8MM fusing
On the i.MX8MM the A-core are stored in fuse banks 6-7, words 0 to 3:
=> fuse prog -y 6 0 0xEA2F0B50
=> fuse prog -y 6 1 0x871167F7
=> fuse prog -y 6 2 0xF5CECF5D
=> fuse prog -y 6 3 0x364727C3
=> fuse prog -y 7 0 0x8DD52832
=> fuse prog -y 7 1 0xF158F65F
=> fuse prog -y 7 2 0xA71BBE78
=> fuse prog -y 7 3 0xA3AD024A
Alternatively, use the kernel to program the A-core fuses using SDP via NXP’s Universal Update Utility with a script as follows:
uuu_version 1.2.39

SDP: boot -f imx-boot-mfgtool

SDPU: delay 1000
SDPV: write -f u-boot-mfgtool.itb
SDPV: jump

FB: ucmd fuse prog -y 6 0 0xEA2F0B50
FB: ucmd fuse prog -y 6 1 0x871167F7
FB: ucmd fuse prog -y 6 2 0xF5CECF5D
FB: ucmd fuse prog -y 6 3 0x364727C3
FB: ucmd fuse prog -y 7 0 0x8DD52832
FB: ucmd fuse prog -y 7 1 0xF158F65F
FB: ucmd fuse prog -y 7 2 0xA71BBE78
FB: ucmd fuse prog -y 7 3 0xA3AD024A

FB: acmd reset

FB: DONE
Upon reboot, if CONFIG_IMX_HAB was enabled in U-boot, HAB will raise events to indicate that an unsigned SPL image has been executed. Those events can be inspected by running U-Boot’s command hab_status.
Note
Once the security fuses have been programmed, we recommend that all your UUU scripts are modified to use only signed SPL images since some of those scripts might depend on the occurance - or not - of HAB events.
To secure the platform, there is an extra fuse that needs to be programmed: we will only take that step once we are sure that we can successfully sign and boot a signed SPL image with a matching set of keys (containing the same public key hashes as those stored in the SRK fuses).
How to sign an SPL image (I)
To build a signed image, you need to create a Command Sequence File - CSF - describing all the commands that the ROM will execute during secure boot. These commands instruct HAB on which memory areas of the image to authenticate, which keys to install and use, what data to write to a register and so on. In addition, the necessary certificates and signatures involved in the verification of the image are attached to the CSF generated binary output.
We keep a template at lmp-tools/security/imx_hab4/u-boot-spl-sign.csf-template.
This template is used by the lmp-tools/security/imx_hab4/sign-file.sh script which dynamically generates the authenticate data command “blocks” line(s) based on your binary. The command “blocks” line contains three values:
- The first value is the address on the target where HAB expects the signed image data to begin.
- The second value is the offset into the file where CST will begin signing.
- The third value is length in bytes of the data to sign starting from the offset.
It is also required that the IVT and DCD regions are signed. HAB will verify the DCD and IVT fall in an authenticated region: The CSF will not successfully authenticate unless all commands are successful and all required regions are signed.
In the case of the SPL, you must enable CONFIG_IMX_HAB to include the IVT and DCD information.
The lmp-tools/security/imx_hab4/sign-file.sh script executes NXP’s Code Signing Tool after preparing the CSF information based on the template:
$ cd security/imx_hab4/
$ ./sign-file.sh --cst ./cst --spl SPL

SETTINGS FOR  : ./sign-file.sh
--------------:
CST BINARY    : ./cst
CSF TEMPLATE  : u-boot-spl-sign.csf-template
BINARY FILE   : SPL
KEYS DIRECTORY: .
FIX-SDP-DCD   : no

FOUND HAB Blocks 0x2f010400 0x00000000 0x00018c00
CSF Processed successfully and signed data available in SPL_csf.bin
$ ls SPL.signed
SPL.signed
All intermediate files generated during the signing process are removed by the script.
Booting this signed SPL image and inspecting the HAB status should give no HAB events therefore indicating that the image was correctly signed:
=> hab_status
Secure boot disabled
HAB Configuration: 0xf0, HAB State: 0x66
No HAB Events Found!
Warning
The next fuse instruction will close the board for unsigned images: make sure you can rebuild the signed images before programing that fuse.
Now we can close the device meaning that from thereon only signed images can be booted on this platform. For that, on the i.MX7ULP we need to fuse bit31 of word 6 from bank 29 (SEC_CONFIG[1] in the documentation):
=> fuse prog 29 6 0x80000000
For i.MX8MM you have to fuse bit25 of word 3 from bank 1 (SEC_CONFIG[1] in the documentation):
=> fuse prog 1 3 0x2000000
Rebooting the board and checking the HAB status should give:
=> hab_status
Secure boot enabled
HAB Configuration: 0xcc, HAB State: 0x99
No HAB Events Found!
Warning
A production device should also “lock” the SRK values to prevent bricking a closed device. Refer to the Security Reference Manual for the location and values of these fuses.
How to sign an SPL image for SDP (II)
Once the device has been closed, only signed images will be able to run on the processor: this means that upgrades via UUU/SDP will stop working unless the SPL it uses is properly signed.
1. On older SoCs, the SDP imposes the following restrictions: * SDP requires that the CSF is modified to include a check for the DCD table * SDP requires that the DCD address of the image is cleared from the header
To comply with these requirements we need to sign the image adding the --fix-sdp-dcd parameter:
$ cd security/imx_hab4/
$ ./sign-file.sh --cst ./cst --spl SPL --fix-sdp-dcd

SETTINGS FOR  : ./sign-file.sh
--------------:
CST BINARY    : ./cst
CSF TEMPLATE  : u-boot-spl-sign.csf-template
BINARY FILE   : SPL
KEYS DIRECTORY: .
FIX-SDP-DCD   : yes

4+0 records in
4+0 records out
4 bytes copied, 8.3445e-05 s, 47.9 kB/s
4+0 records in
4+0 records out
4 bytes copied, 6.6832e-05 s, 59.9 kB/s
FOUND DCD Blocks 0x2f010000 0x0000002c 0x00000258
FOUND HAB Blocks 0x2f010400 0x00000000 0x00021c00
CSF Processed successfully and signed data available in SPL_csf.bin
$ ls SPL.signed
SPL.signed
- On newer SoCs (ie imx7ulp), using the
--fix-sdp-dcdparameter is not required.
Note
Which SoCs fall in which category can be identified by inspecting the Universal Update Utility g_RomInfo: if the option ROM_INFO_HID_SKIP_DCD is configured, then the DCD does not need to be fixed for that SoC.
Booting signed images with the Universal Update Utility
1. On older SoCs we need to let SDP know the DCD location as well as inform that the DCD has been cleared.
So a typical UUU boot script would be as (replace @@MACHINE@@ with your machine configuration name)
uuu_version 1.0.1

SDP: boot -f SPL.signed-@@MACHINE@@ -dcdaddr 0x2f010000 -cleardcd

SDPU: delay 1000
SDPU: write -f u-boot-@@MACHINE@@.itb
- On newer SoCs - those where SDP does not impose DCD restrictions - the UUU boot script would be:
uuu_version 1.0.1

SDP: boot -f SPL.signed-@@MACHINE@@

SDPU: delay 1000
SDPU: write -f u-boot-@@MACHINE@@.itb
On both cases, if the device has been closed and it is only accepting signed images, it is recommended that UUU is started before powering the board and before connecting it to the host PC so that UUU polls for the connection and responds to it as soon as possible. To that effect we need to make sure of UUU’s polling period flag:
$ uuu -pp 1 file.uuu
How to sign an M4 binary for HAB validation
If you wish to use the i.MX HAB validation process when booting an M4 binary, it will also need to be signed in a similar manner. This is also true for SoCs such as i.MX7ULP which support “dual-boot” mode. The M4 bootrom loads the M4 binary at power on. If the device is in a closed state, the bootrom requires the M4 binary to be signed.
Signing the M4 application image is nearly the same as before. Instead of the --spl parameter, use --m4app:
$ cd security/imx_hab4/
$ ./sign-file.sh --cst ./cst --m4app sdk20-app_flash.img

SETTINGS FOR  : ./sign-file.sh
--------------:
CST BINARY    : ./cst
CSF TEMPLATE  : u-boot-spl-sign.csf-template
BINARY FILE   : sdk20-app_flash.img
KEYS DIRECTORY: .

4+0 records in
4+0 records out
4 bytes copied, 8.5903e-05 s, 46.6 kB/s
4+0 records in
4+0 records out
4 bytes copied, 0.000117146 s, 34.1 kB/s
FOUND HAB Blocks 0x1ffd1000 0x00001000 00015000
CSF Processed successfully and signed data available in sdk20-app_flash.img_csf.bin
$ ls sdk20-app_flash.img.signed
sdk20-app_flash.img.signed
Booting a closed system with a CAAM device
If you are running with a Cryptographic Acceleration and Assurance Module device you will notice that in the closed configuration and for devices with HAB 4.4.0 (or lower), the HAB code locks the job ring and DECO master ID registers.
So if the user-specific application requires any changes in the CAAM MID registers, it is necessary to add the “Unlock CAAM MID” command into the CSF file.
Not doing so, since the CAAM will not have been configured for the proper MIDs, leaves some of the CAAM registers not accessible for writing and any attempt to write to them will cause system core aborts.
Note
The current NXP BSP implementation expects the CAAM registers to be unlocked when configuring the CAAM to operate in the non-secure TrustZone world. This applies when OP-TEE is enabled on the i.MX 6, i.MX 7, and i.MX 7ULP processors.
Our u-boot-spl-sign.csf-template takes care of supporting CAAM on closed platforms by adding the following section:
[Authenticate CSF]

[Unlock]
Engine = CAAM
Features = MID, RNG