MCUboot Key Provisioning HOWTO
This page explains how to use your own firmware signing key pair to secure the boot process on your Zephyr microPlatform devices.
Requirements
You must have the Zephyr microPlatform installed on your system; see instructions in Install Zephyr microPlatform for details.
Any board supported by the Zephyr microPlatform can be used with these instructions.
Generate Keys
From the Zephyr microPlatform installation directory, generate an RSA 2048 key pair by running:
./mcuboot/scripts/imgtool.py keygen -k my-key.pem -t rsa-2048
(MCUboot uses 2048 bit RSA keys by default; if you want a different
key type, you need to change -t option and adjust your MCUboot
build configuration accordingly.)
Important
The contents of the file my-secret-key.pem must be stored securely and kept secret.
Configure MCUboot to Use Your Key
Now edit the MCUboot configuration to set the
CONFIG_BOOT_SIGNATURE_KEY_FILE Kconfig value to point to your .pem
file, which you created in the previous step.
We present two options for doing this below; choose which one is best for you. If in doubt, use option 1, then save the resulting MCUboot binary and flash it to boards as needed.
Option 1: One-Time Configuration
To do a one-time update of an existing MCUboot build directory’s
.config file, setting up the key temporarily, start by
running this:
west build -t menuconfig -d build-mcuboot
Then, in the menuconfig interface:
- Type
/to enter the search UI - Type
BOOT_SIGNATURE_KEY_FILEin the search box to find the option, and pressEnterto select it. - Press
Enteragain to change its value, typing the absolute path to your key file,my-key.pem, then pressingEnterto set the new value. - Type
Sto save the configuration. Accept the default file name to save it over your existing.configfile in the build directory.
Option 2: Permanent Configuration
To make the change permanent and part of your MCUboot repository,
edit mcuboot/boot/zephyr/prj.conf to set the value, and
commit the change. (This means all users of your Git tree need
access to the key.)
Build and Flash Custom MCUboot
After configuring MCUboot to use your key using either option 1 or 2, build and flash it to your board as usual:
west build -s mcuboot/boot/zephyr -d build-mcuboot
west flash -d build-mcuboot
Build, Sign, and Flash App With Custom Key
You can now sign your Zephyr application binary with the new
key. Assuming the build directory is in build-my-app:
west sign -t imgtool -d build-my-app -- --key my-secret-key.pem
This generates zephyr.signed.bin and zephyr.signed.hex
files in the current directory. You can choose different file names
with the -H and -B options.
To verify your setup, flash the signed binary to your board. E.g. if your west runner uses Intel Hex files:
west flash -d build-my-app --hex-file zephyr.signed.hex
Appendix: Boot Process Overview
If you’re unfamiliar with the overall boot process, this section may help.
When your Zephyr microPlatform device boots, MCUboot checks for a cryptographically signed firmware update, then installs and runs it if one is available. Simplified, the boot process looks like this:
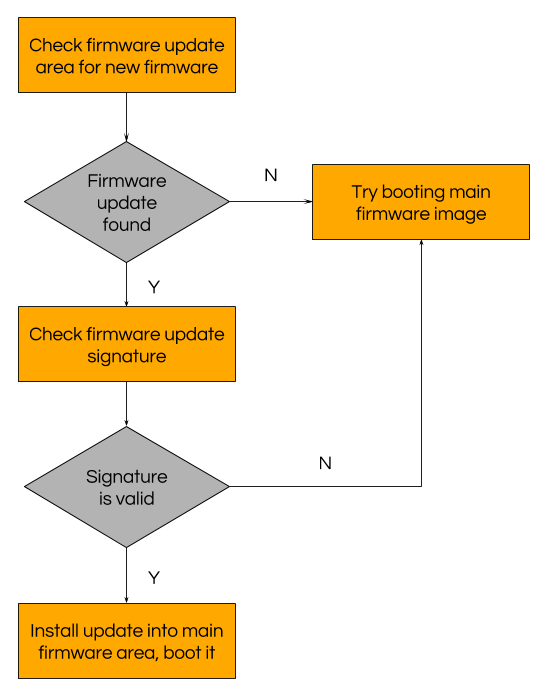
Zephyr microPlatform boot decision tree.
The firmware update signature check uses a public key stored in the MCUboot binary running on the device. MCUboot checks that the firmware update is signed by the corresponding private key before booting it. This mitigates against attacks which try to boot untrusted firmware on your device.
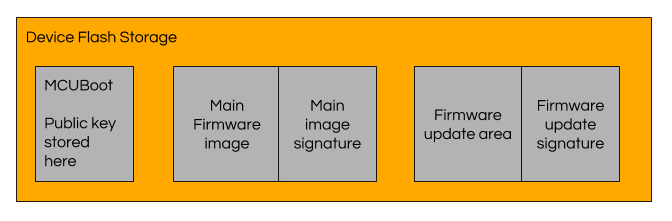
Zephyr microPlatform device flash layout.
To make getting started easy, the MCUboot repository’s source code contains a default public key, along with its private key in a data file. Since the private key is not secret, this is not secure to use in production. When deploying your devices, you need to use your own key pair, with a private key that you must keep secret.
(If you’re new to these ideas, check out the Public-key cryptography and Digital signature pages on Wikipedia.)